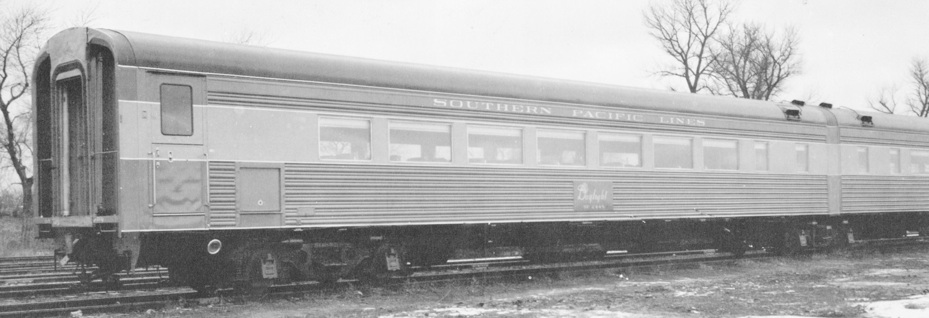
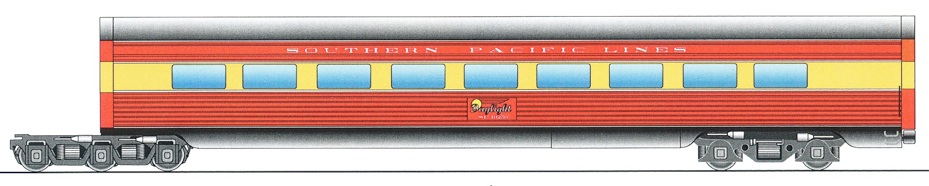
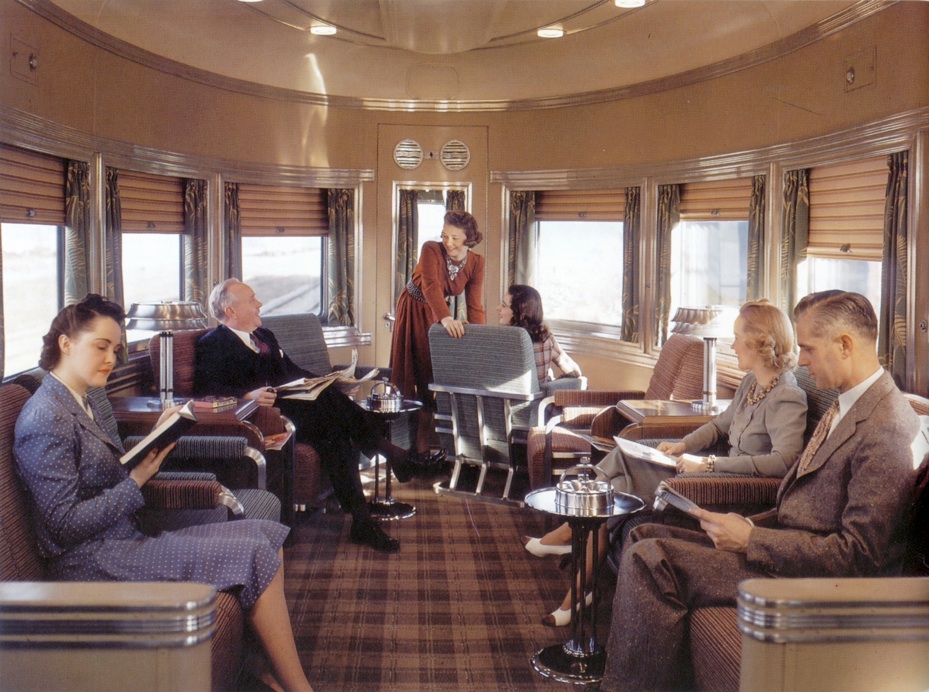
Southern Pacific Daylight Train 99

The following consist is representative of Train 99 that ran from Los Angeles to San Francisco. Consisting of 16 cars, this configuration was effective June 18, 1941.
| Equipment | Number | Class | Ordered | Delivered | Trucks | Seats | Radio / PA |
|---|---|---|---|---|---|---|---|
| 4-8-4 GS-4 | 4449 | GS-80 | 1940 | May 1941 | 80" drivers | ||
| Tender | 9119 | 235-R-1 | 1940 | May 1941 | Buckeye | ||
| Chair-Baggage | 3303 | 79-CB-1 | March 1939 | December 1939 | 4-TC-6 | 44 | Radio-PA (R1) |
| Articulated-Chair-W | 2466 | 66-ACW-2 | August 1940 | March-July 1941 | 4-TC-7 | 46 | Grouped with R1 |
| (articulation point) | 4-TCA-3 | ||||||
| Articulated-Chair-M | 2465 | 66-ACM-2 | August 1940 | March-July 1941 | 4-TC-7 | 46 | Grouped with R1 |
| Articulated-Chair-W | 2468 | 66-ACW-2 | August 1940 | March-July 1941 | 4-TC-7 | 46 | Grouped with R2 |
| (articulation point) | 4-TCA-3 | ||||||
| Articulated-Chair-M | 2467 | 66-ACM-2 | August 1940 | March-July 1941 | 4-TC-7 | 46 | Grouped with R2 |
| Articulated-Chair-W | 2470 | 66-ACW-2 | August 1940 | March-July 1941 | 4-TC-7 | 46 | Grouped with R2 |
| (articulation point) | 4-TCA-3 | ||||||
| Articulated-Chair-M | 2469 | 66-ACM-2 | August 1940 | March-July 1941 | 4-TC-7 | 46 | Radio (R2) |
| Coffee Shop | 10261 | 70-AD-4 | August 1940 | July 1941 | 4-TC-7 | 80 | Grouped with R3 |
| (articulation point) | 6-TCA-1 | ||||||
| Kitchen | 10260 | 57-AD-2 | August 1940 | July 1941 | Grouped with R3 | ||
| (articulation point) | 6-TCA-1 | ||||||
| Diner | 10259 | 70-AD-3 | August 1940 | July 1941 | 4-TC-7 | 72 | Grouped with R3 |
| Articulated-Chair-W | 2476 | 66-ACW-2 | August 1940 | March-July 1941 | 4-TC-7 | 46 | Grouped with R3 |
| (articulation point) | 4-TCA-3 | ||||||
| Articulated-Chair-M | 2475 | 66-ACM-2 | August 1940 | March-July 1941 | 4-TC-7 | 46 | Radio-PA (R3) |
| Chair | 2486 | 79-C-2 | August 1940 | July 1941 | 4-TC-7 | 44 | Grouped with R4 |
| Tavern | 10315 | 79-T-1 | March 1939 | December 1939 | 4-TC-6 | 56 | Radio (R4) |
| Parlor | 3003 | 79-PR-1 | March 1939 | December 1939 | 4-TC-6 | 27 | Grouped with R5 |
| Parlor-Observation | 2955 | 79-PRO-2 | August 1940 | July 1941 | 4-TC-7 | 22 | Radio-PA (R5) |


A) Hand Brake, B) Folding Desk, C) Equipment Locker, D) Electric Locker, E) Regulator Locker, F) Supply Locker, G) Supply Locker, H) Counter, I) Glass Shelves, J) Hopper, K) Water Cooler,
L) Mens Restroom, M) Womens Restroom, N) Folding Seat, O) Luggage Compartment, P) Vestibule, Q) Dutch Door, R) Reclining Chairs
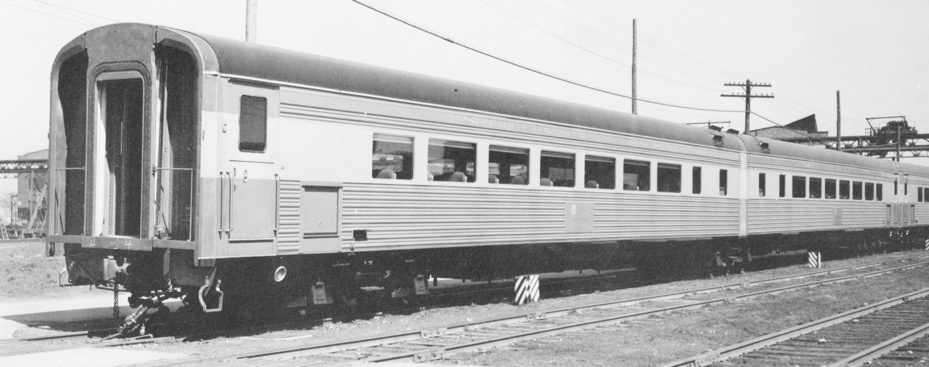
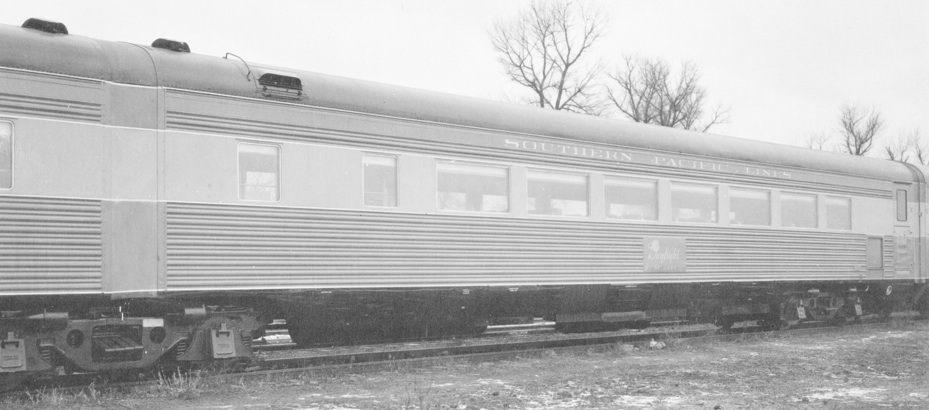
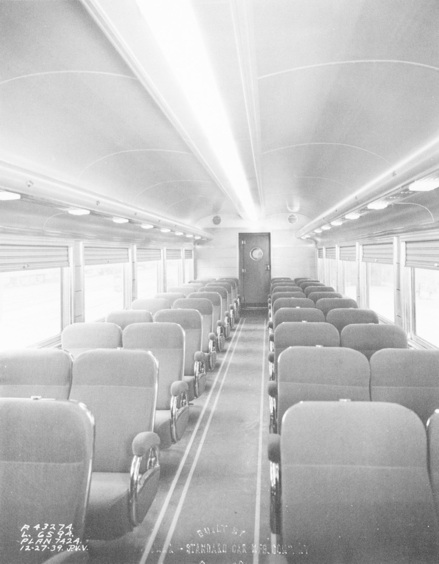
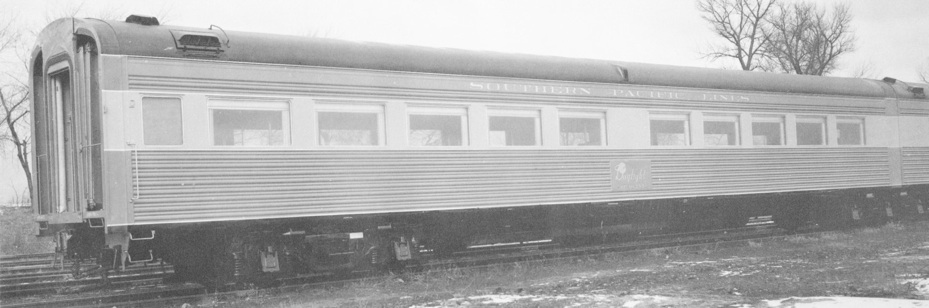
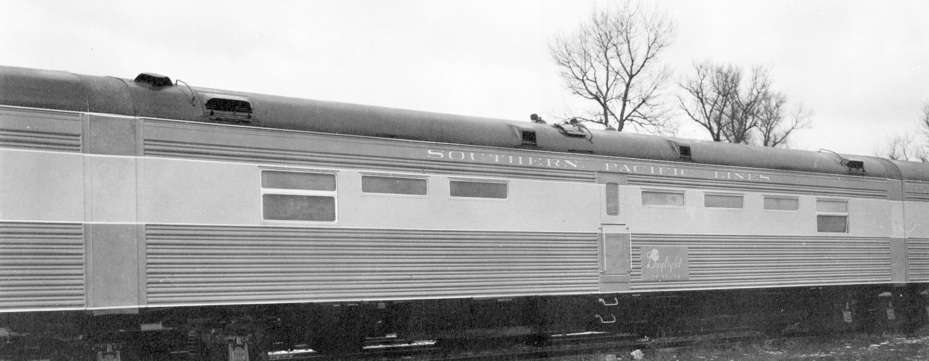
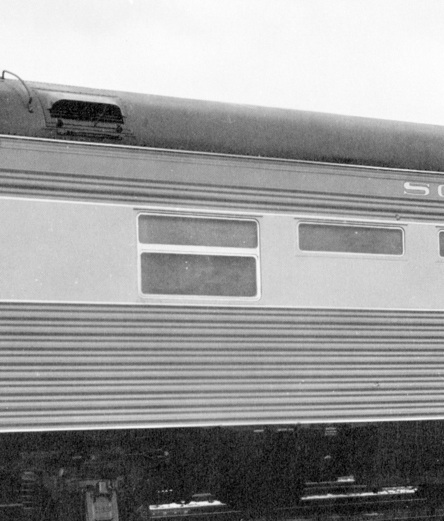
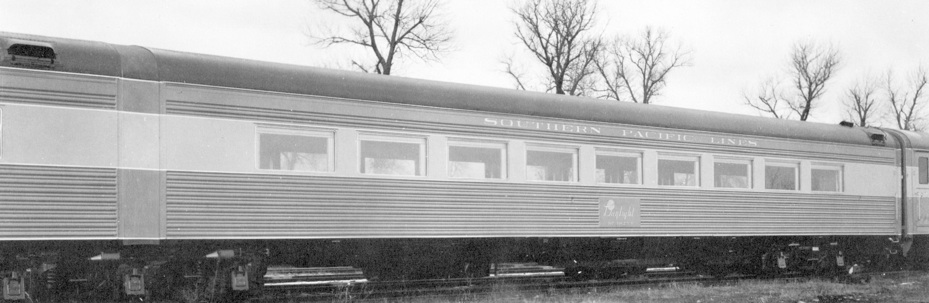
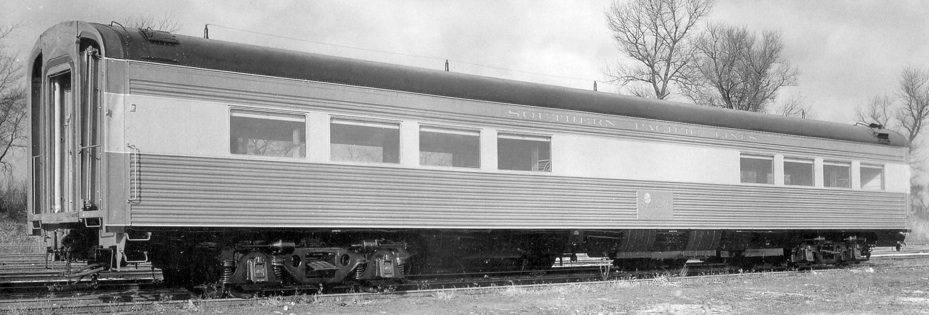
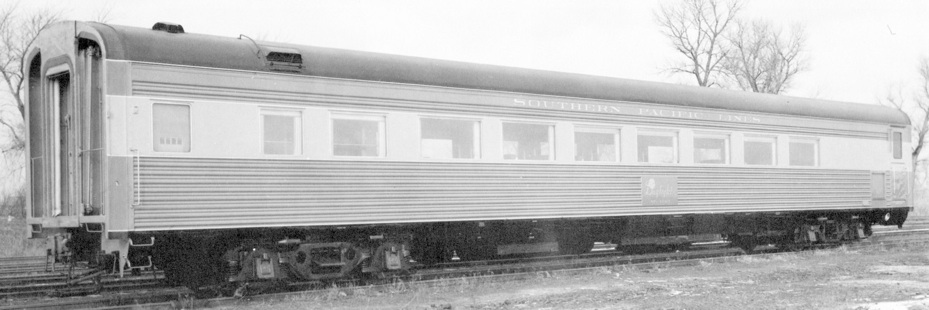
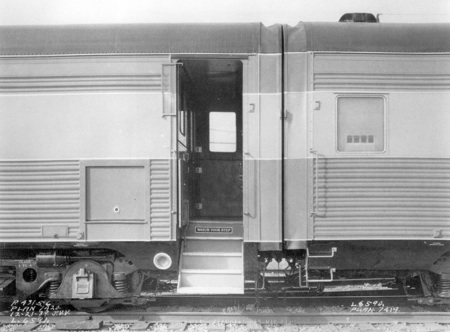
The Coast Daylight was completely re-equipped in 1939, only two years after the first train was placed into service. The first car in the new consist was the Chair-Baggage car which was ordered in March 1939 and delivered in December 1939. The car was 79 feet long over the ends and 81 feet 2 inches to buffers. Note the radio antenna on the roof. This car was equipped with a radio and public address system.
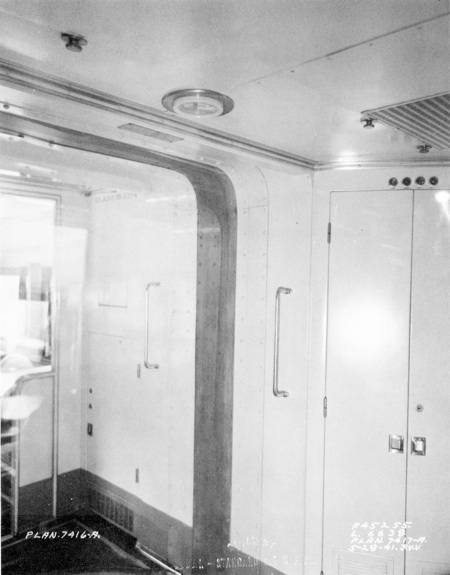
The interior of the 1939 Chair-Baggage car had no unique appointments. This is the head end of the car where the 19 foot 10 inch long baggage compartment was located. The tongue-and-groove yellow pine floor was finished with a maroon varnish, the corrugated aluminum panels painted postal car brown, and the ceiling white and later painted a sea foam green. The outside brake wheel extended through the end and could be operated from the inside. The screen work near the floor housed the steam heating coils. The screened holes in the ceiling are fresh air ventilators. The head end door was equipped with a slide bar locking device.
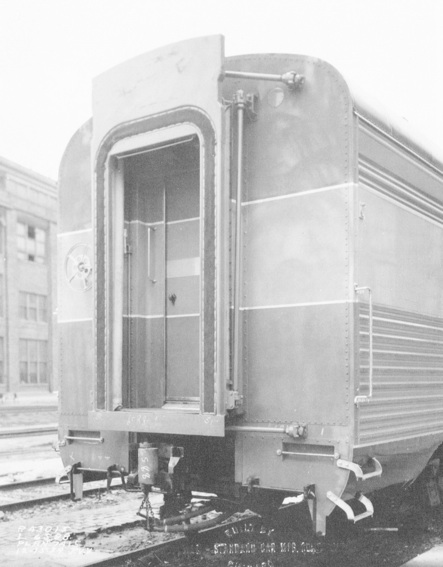

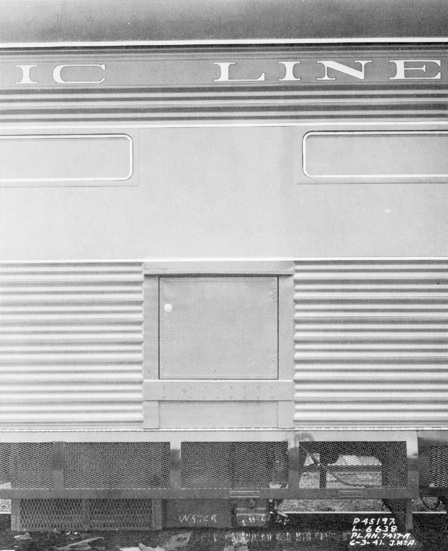
In an unusual departure from tradition, the SP had Pullman-Standard paint the orange window band all the way around the front diaphragm of the Chair-Baggage. This made the exposed portions of the car which were adjacent to the tender of the GS-4 look more complete. The external brake wheel can be seen to the left of the diaphragm. These cars were also equipped with type "E" tightlock couplers, cadmium plated grabirons and stirrups, standard width diaphragm on the head end and a full width on the tail end, and 4-TC-6 trucks with one having a special speed control for the train braking action and the other one having a Spicer drive for the body hung 10 kilowatt generator. The empty weight of the car was 123,000 pounds.
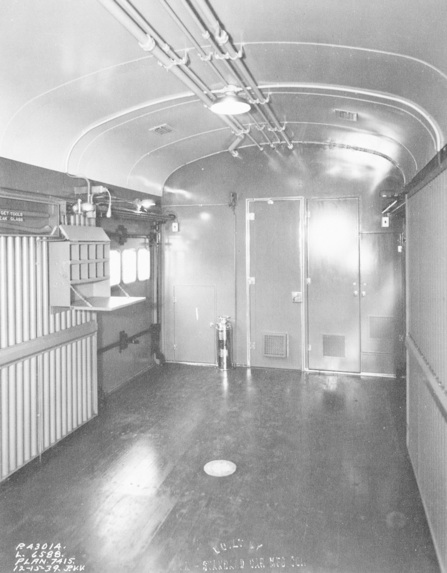
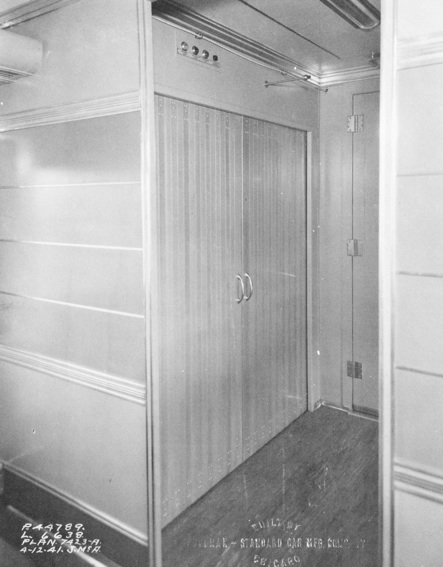
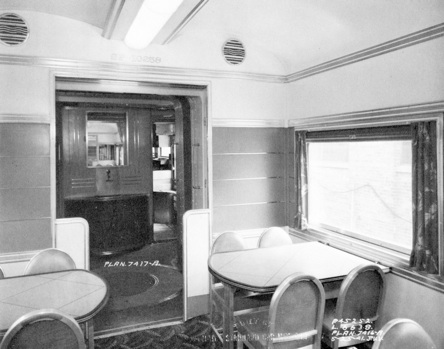
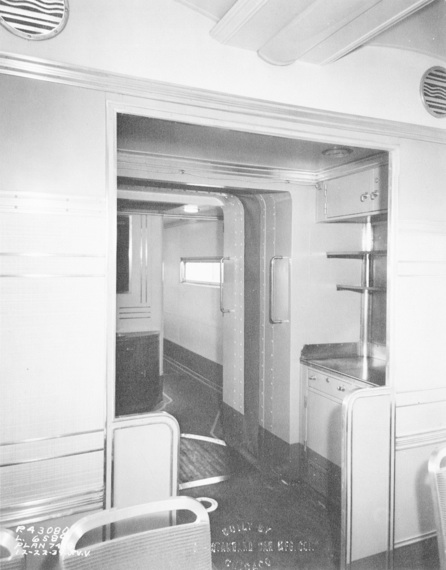
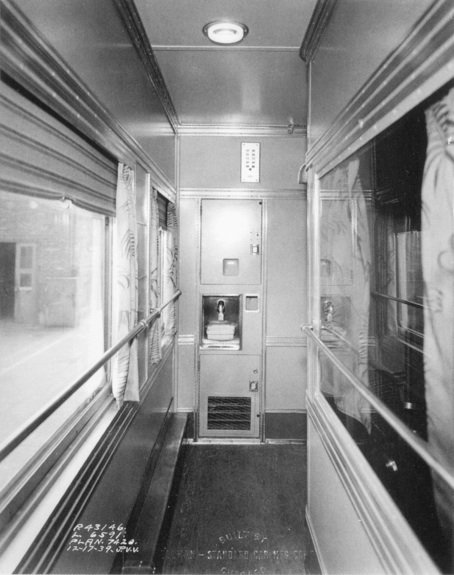
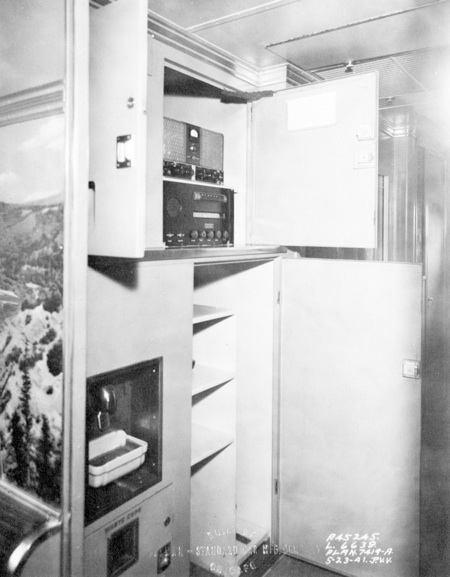
At the front end of the coach section, space was set aside for the News Agent who sold sandwiches, candy, soda, and milk to budget-minded coach passengers. The metal cabinet to the lower left was a dry ice reefer for ice cream. Note the pantograph gate, next to the reefer, is pushed back to the open position. The lockers housed food supplies as well as newspapers, magazines, cigarettes, and Daylight mementos. The cabinet doors on the right wall of this space housed the controls for the public address system, where the train Passenger Agent used the microphone to make announcements. The screened duct in the ceiling is the inlet for air conditioning or heat. The door in the center leads to the baggage compartment.
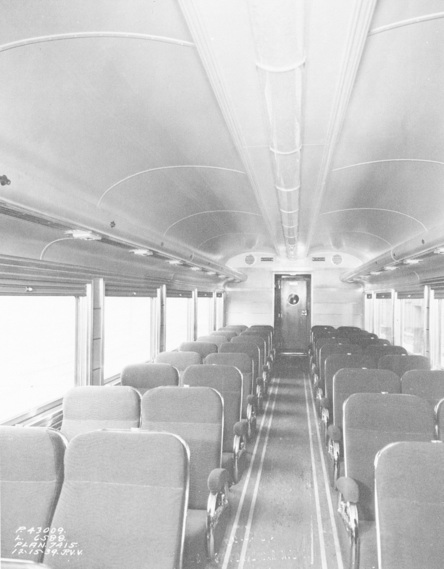
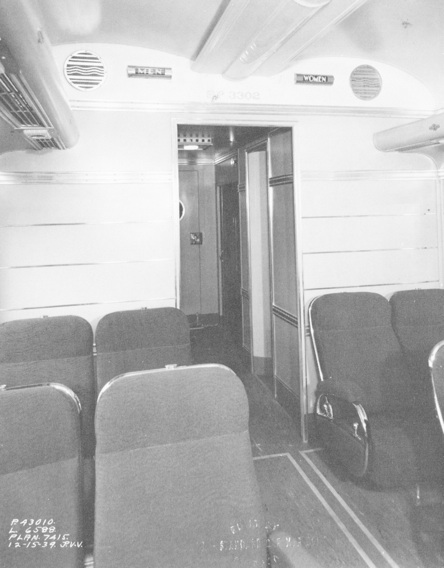
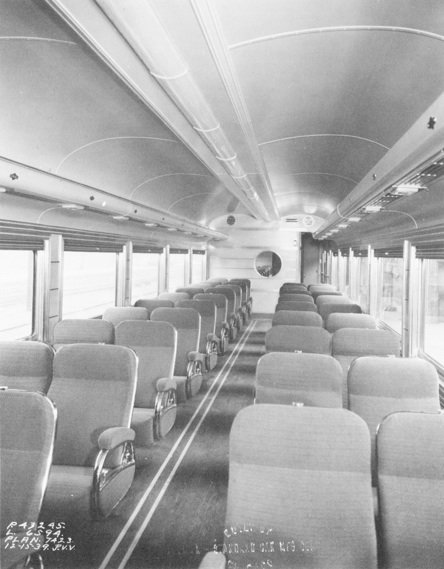
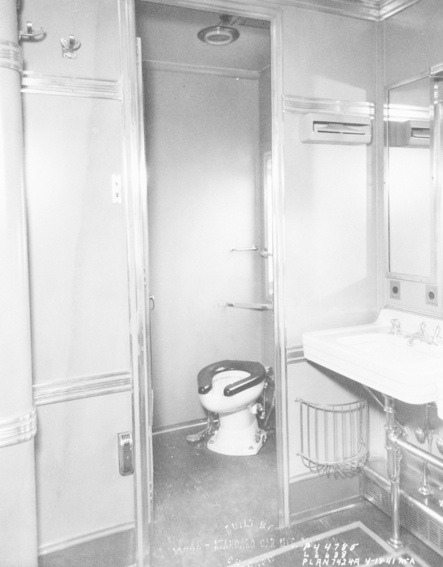
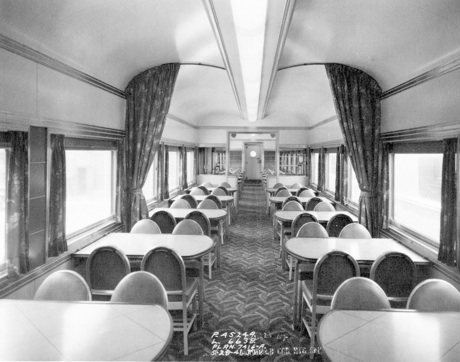
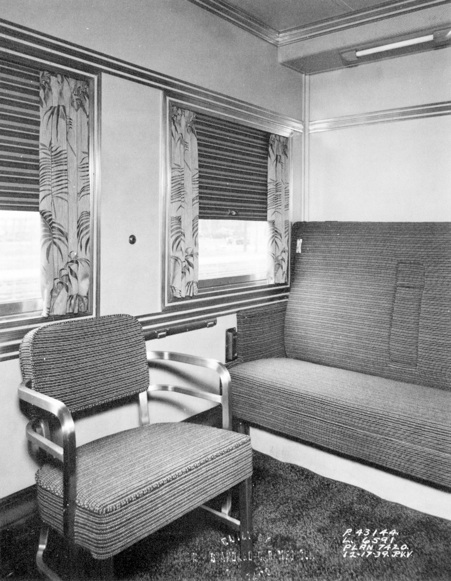
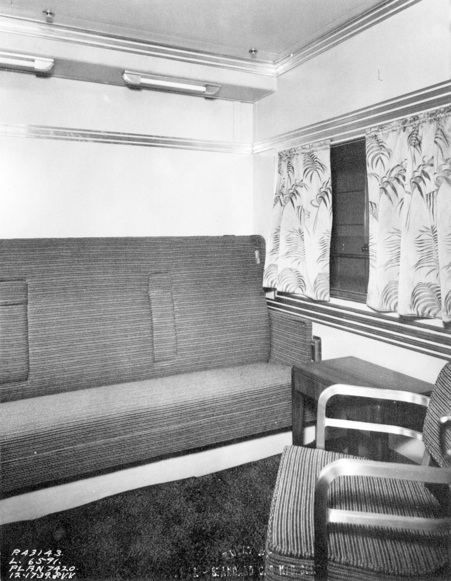
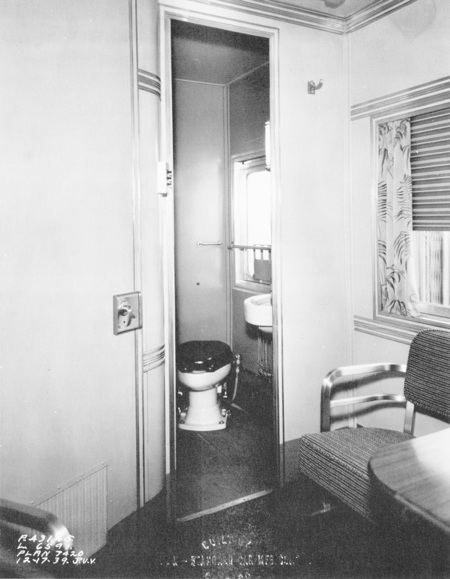
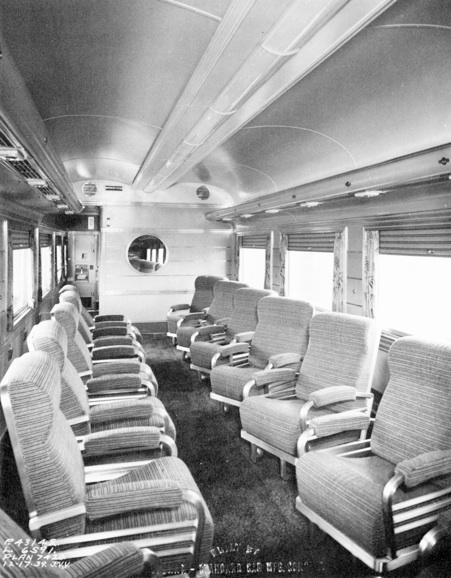
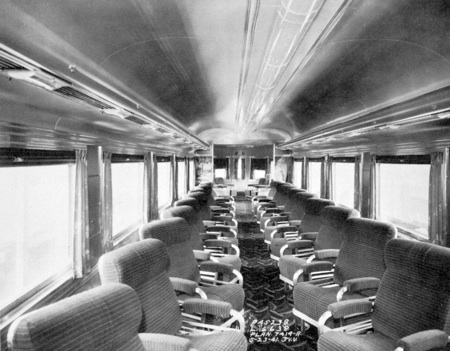
The Chair-Baggage seats were identical to those throughout the entire train. Unlike the way colored fabric upholstery of the 1937 cars, a simpler mono-toned fabric was used in the 1939 and 1941 coach seats. There were 44 seats which the double-seat chairs rotated and reclined. The primary lighting above the seats were Spot-ray lamps below the basket racks. A secondary ceiling lighting system using neons increased the lumens output to 450, brightening the car. The flooring was rubber tile with double striping for the safe walk zones. The men's and women's restrooms were located in the back end of the car, as indicated by the signs above the back seats. Recessed speakers for the radio/public address system were located near the ceiling at both ends of the coach compartment. Beyond the restrooms were the baggage elevator compartments, one on each side. The center door in the back leads to the vestibule and second car in the consist.
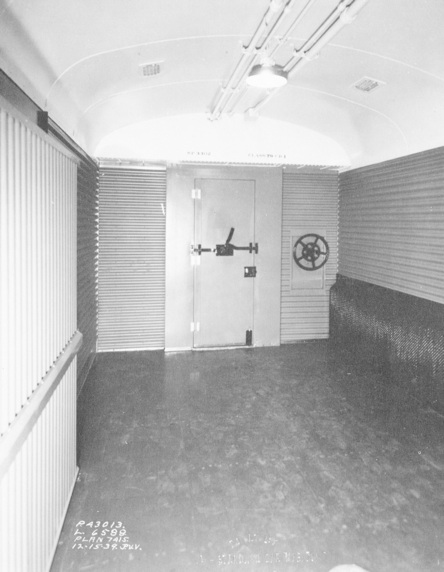
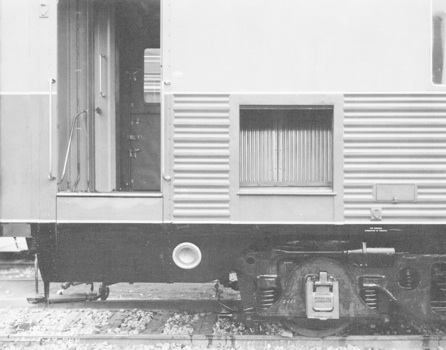
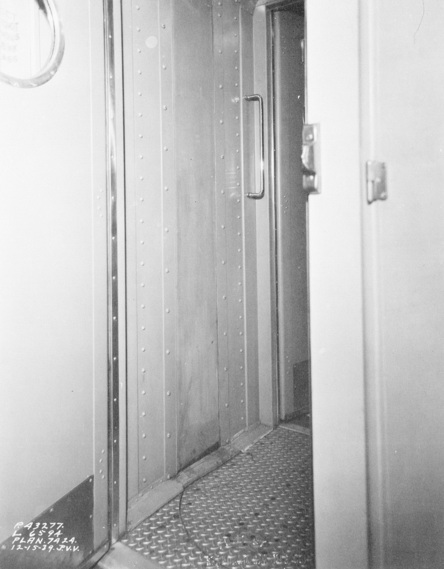
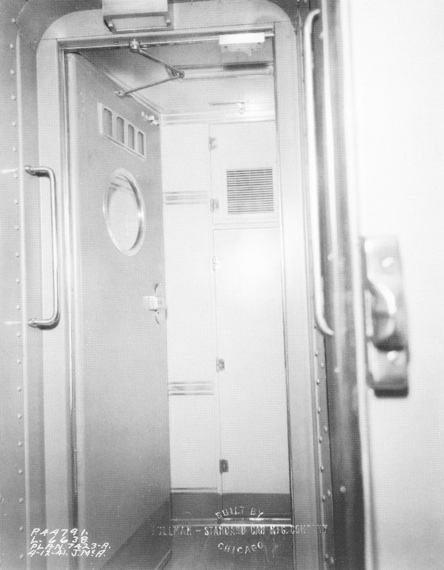
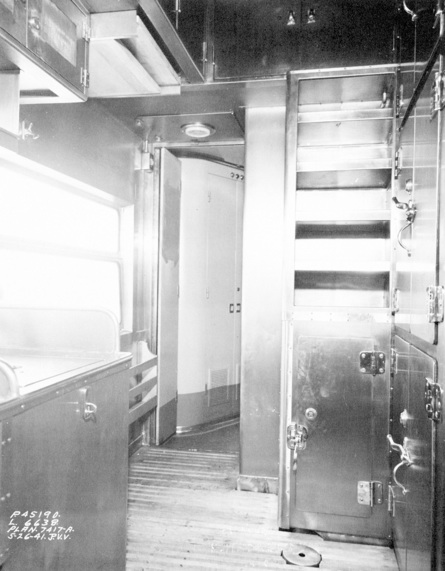
This is the back end of the baggage compartment. The door in the center lead to the coach section of the car, and when necessary, the baggageman used the toilet facilities located there. The doors to the right and left housed equipment and supplies. The unique "plug type" side baggage door had a special locking device and four windows. The fire extinguisher was located to the left of the center door. The access plate on the floor was for inspection of the truck kingpin.
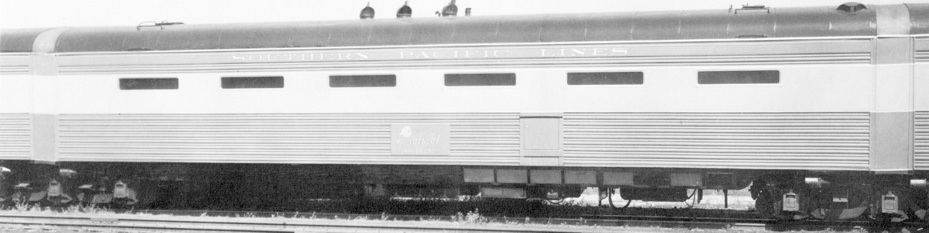
The Daylights were designed to have radio receivers spaced throughout the train. These were trainlined through the public address system to cars which had no receiver. Generally, only four cars per train set carried the receivers (always the Chair-Baggage, Tavern, and Parlor-Observation cars with at least one Chair car), and they were identifiable by the radio antenna on the roof. The antenna posts consisted of a tapered section which was attached to the center of the roof panels. On top of this was a small porcelain insulator. The galvanized antenna wire was fastened to the top of the insulators. The spacing of the posts was about 15 feet apart, and using 5 posts provided for a 60 foot antenna which was the proper length for the wavelength of AM transmissions.
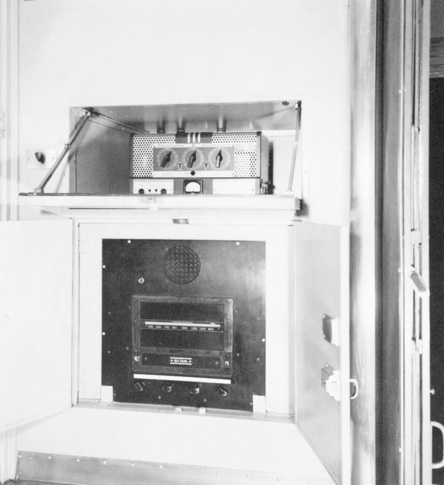
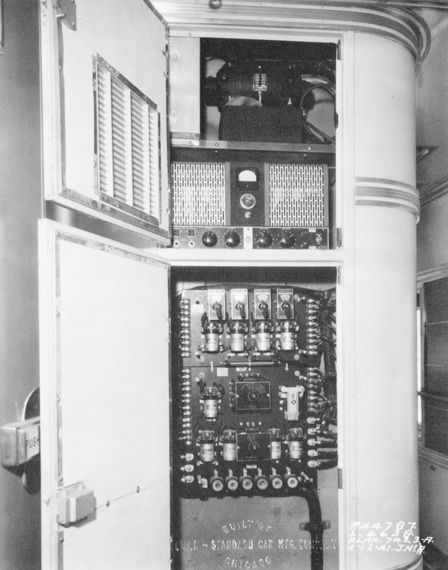
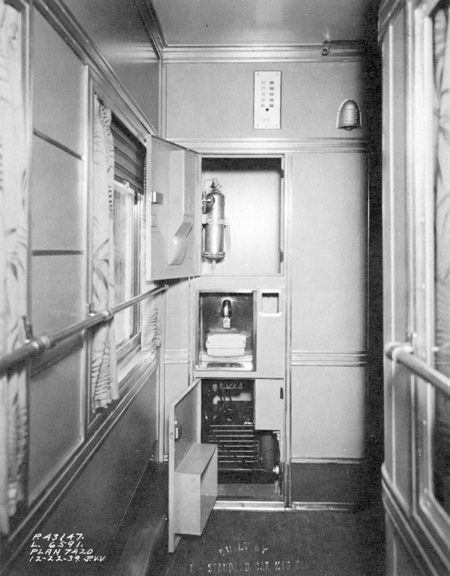
This is the view of the public address amplifier (above) and the RCA model 15K radio tuner (below) over the News Agent stand. The 1939 and 1941 cars carried Safety Motor-Alternators for the fluorescent lighting, which also provided power for the public address and radio system.

Articulated-Chair Car


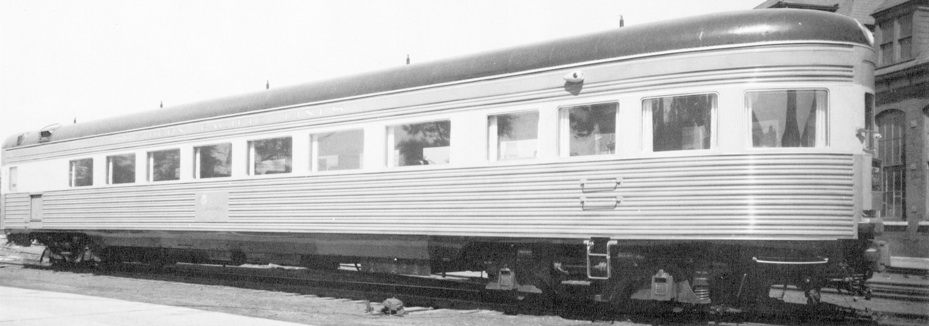
This photo of the ACW car number 2448 was taken on December 23, 1939. Six sets of these cars were ordered March 1939 and were delivered in December 1939 for the Daylight (66-ACW-1). In August 1940, 14 additional sets were ordered for service on the Morning Daylight, Noon Daylight, and San Joaquin Daylight (66-ACW-2). The ACW cars had an empty weight of 101,000 pounds.


The Articulated-Chair car consisted of two chair cars that shared a single truck at the articulation point. One car (ACW) had a Womens Restroom/Ladies Lounge and the other (ACM) had a Mens Restroom/Mens Smoking Room. The restrooms were located closest to the articulation point. The Articulated-Chair cars were designed to save space and weight by having only three trucks and two restrooms for two cars instead of four trucks and 4 restrooms for two cars. Each car was 66 feet over the ends and 68 feet 1 inch from the center of articulation to the buffer, for a total length of 136 feet 2 inches when measured as a unit. Each car seated 46 passengers each, 92 total. In the consist, the Articulated-Chair car was always oriented with the ACW car forward. ACW cars were even numbered cars (and the higher numbered car) and the ACM cars were odd numbered cars. Some sets were equipped with radios with the antenna on the ACM car. Cars 2461, 2469, 2473, and 2475 had radios and antenna.
A) Hand Brake, B) Vestibule, C) Dutch Door, D) Luggage Compartment, E) Low Bulkhead, F) Water Cooler, G) Womens Restroom, H) Control Locker, I) Electric Locker, J) Hopper, K) Reclining Chairs
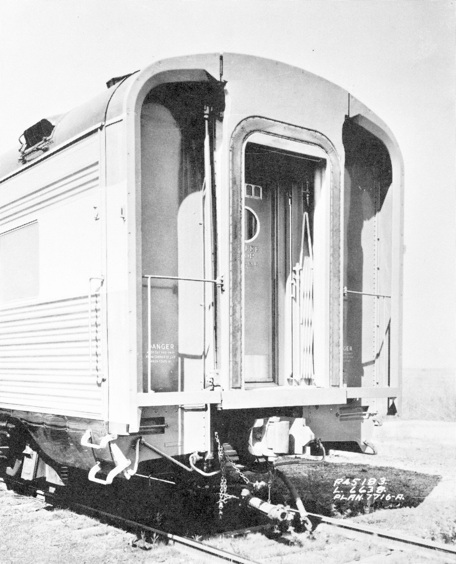
In this outside view you see the vestibule with the steps in the up position and the baggage door open with the shelves lowered and the interior doors closed. The rectangular box to the right of the baggage door is the elevator control box with four large black buttons inside marked DOOR UP, DOOR DOWN, SHELVES UP, and SHELVES DOWN. Below the control box is a small covered opening that looks like an electrical outlet, but actually is the emergency shelf mechanism. If the power failed or something jammed, the porter could insert a crank, similar to a carpenter's brace, and move the shelves up or down manually. The baggage elevator was designed to keep baggage from pilling up on the vestibules and blocking the smooth flow of passengers on and off the train. This made it possible at stops for the Daylight to exchange upwards of 300 passengers in about five minutes, thus keeping to the rapid 9 hour 45 minute schedule. Note the round loading step light adjacent to the vestibule, perfect for night time operations, however seldom were these cars used in the dark.
At the forward end of the ACW car are the baggage elevator compartments. They were on both sides of the car. This view reveals the left side baggage elevator in the starting or down position. When a shelf was loaded, the elevator would lift it toward the roof so the next tier could be racked. The door in the center leads to the vestibule where passengers would enter/exit the car.
Many of the photos on this page were from David Randall's book "The Official Pullman-Standard Library, Vol. 5, Southern Pacific Prewar Cars" and used with permission from the David Randall Collection.
In this view, the baggage elevator is in the up position. Baggage was easily accessible to the passenger and to the porter for sorting. The slots in the side walls where the upper shelf was attached to the worm screws was filled with rubber flaps to cover them. Over the door opening were three pilot lights and a button. The lights, from left to right, read DOOR SWITCH CLOSED, SHELF SWITCH CLOSED, and OUTSIDE DOOR OPEN. The button says simply, TO CLOSE OUTSIDE DOOR. This served as a reminder to the porters who sometimes forgot to close the door.
Interior doors to the baggage compartment were closed while the train was in motion. These doors were made up of vertical aluminum slats hinged together to form a smooth closure. If the baggage was stacked carelessly, this prevented it from falling into the aisle. The smooth closure also added to the overall decor, again stressing SP's attention to detail.
This view shows the interior of the 1939 ACW car looking toward the Womens restroom at the articulated end. Only one restroom was located in each car, so that the two combined cars had both restrooms nearest the articulation. The small pier panels (window separations) and 5 foot 3 inch wide windows gave passengers an excellent view at any angle.
This view shows the interior of the 1941 ACW car looking toward the forward or vestibule end of the car. Note that the seats have been revolved 180 degrees for the photographer. Normally the seats would face the opposite way to conform to SP's Articulated-Chair car orientation with the ACW car forward. This view also shows that the lights have been turned on. Note in the 1941 cars the floor was different, with an inlaid ball and wing pattern.
Looking into the Ladies Lounge section, the wash basins and windows are to the right, the triple chair dressing mirror and table in the center, and the two smoking seats and ash tray to the left. Note you can see the photographer's camera in the mirror below the flash. Fluorescent lamps were used throughout the restroom. You can see them above the mirror. The locker to the left of the mirror housed the water cooler. Access to the water from the cooler was in the passageway outside the restroom which included a water faucet and cup dispenser. The curtain in the foreground on the left (and also viewable in the mirror) shields the restroom area from the door that leads to the passageway.
The other side of the Ladies Lounge was the toilet (hopper) room. Look carefully at the toilet and you will notice two seats, one for a child and one for an adult. The pedal on the floor to the right of the toilet was used for flushing with your foot. Now think for a minute ... where does all that stuff from the toilet and sinks go? Read on!

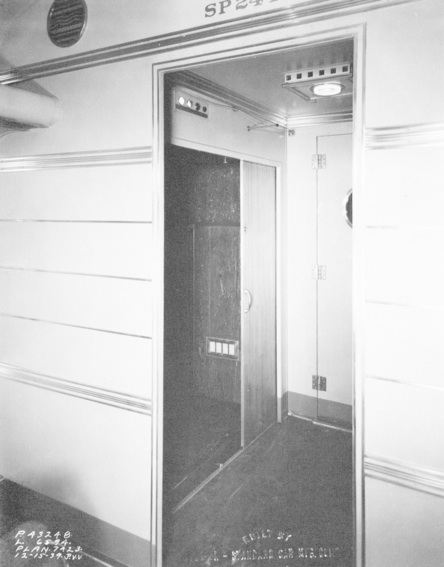
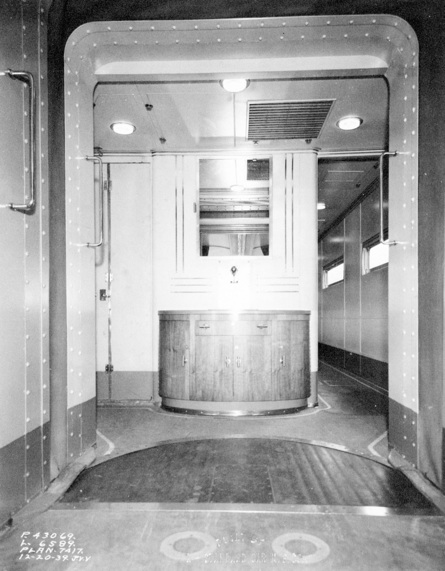
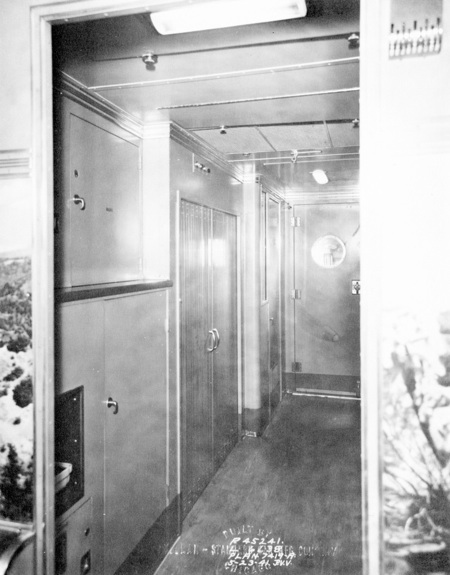
This is the passageway at the articulation looking from the ACW car into the ACM car. A stainless steel diamond-plate walkway and interior diaphragm formed a complete weather-tight enclosure. The interior side of the inner rubber diaphragm was finished with an impregnated aluminum color. The larger foot plate elevated making the locking center pin accessible.
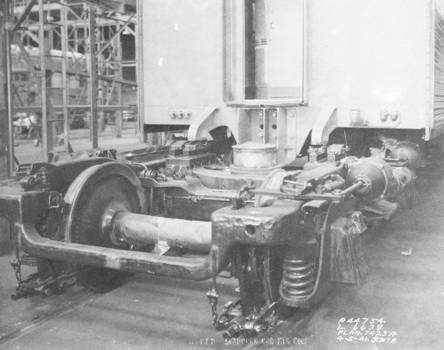
This April 5, 1941 shot during manufacturing shows the female articulation casting has been bolted to the end sill of the ACW car and rests on the specially designed bolster of the truck. The two holes through the casting and the end sill are for a pair of safety cables that will be applied after the other car is mated with this one. These cables were attached to the center sills of the two cars. Frame extensions rest on the side bearings. The male casting of the ACM car will rest on top of the forward one. The rear car also has two frame extensions which will rest on the pads just outside of those of the forward car. The fittings along the car's end sill on the left side are for the internal air lines. The two cars in a set had only one D-22 control valve for all three trucks. Electrical connections are further up the end sheets out of the photo.
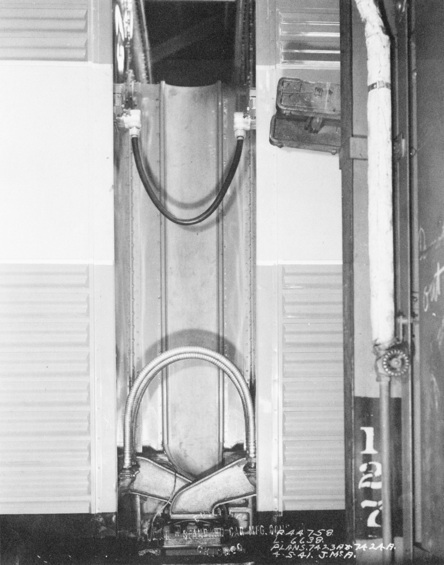
This later photo shows the articulated cars have been mated with the ACW car on the left and the ACM car on the right. On this side of the cars are seen the three internal air brake armored hoses. Above is the electrical connection cable. On the opposite side that you cannot see would be the steam conduit, the air trainline, the communications hose, the trainline for the public address system, and the 110 volt "P" wire to control the electro-pneumatic brakes. Note the frame extensions that rest on the
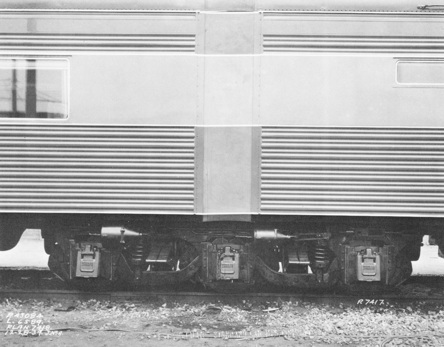
4-TCA-3 truck, with the one from the ACM car on the outside and the other on the inside from the ACW car. The frame extensions helped stabilize the cars for a smoother ride. You can also see the inner rubber diaphragm between the two cars.
This view shows the finished articulation between the two cars. The ACM car is on the left and the ACW car is on the right. A three-piece outer rubber diaphragm (two side panels and one roof panel) has been stretched between the cars. The red pigmented side panels had the orange center band, black side skirt band, and aluminum bronze trim striping applied with rubber base paint. The roof panel was black. The panels stretched as the cars traversed curves. The toilet room window and high window above the sinks in each car were fitted with translucent opaque glass. Car numbering devices are visible in the toilet room windows that had a rectangular clear area in front of the fixture. Above on the roof closest to the articulation are rectangular shaped toilet room exhaust vents that were equipped with an enclosed blower fan assembly. Next to them are the air-conditioning air intake hoods. If you look carefully on the ACM car roof you will see one of the antenna support posts. This is one of six articulated cars that were equipped with a radio receiver. And now for the fun stuff ... the pipes on each side of the truck leaf spring are hopper waste drains for the restrooms. The traditional method of disposing human waste from trains was to deposit the waste onto the tracks. I wonder if SP discouraged the use of the restrooms while at a station? The rubber extensions on the waste drains were added to carry the discharge closer to the track ... at the request of carmen who had to work on those trucks!


A) Electric Locker, B) Hopper, C) Control Locker, D) Mens Restroom, E) Water Cooler, F) Ashtray Stand, G) Low Bulkhead, H) Luggage Compartment, I) Vestibule, J) Dutch Door, K) Hand Brake,
L) Reclining Chairs
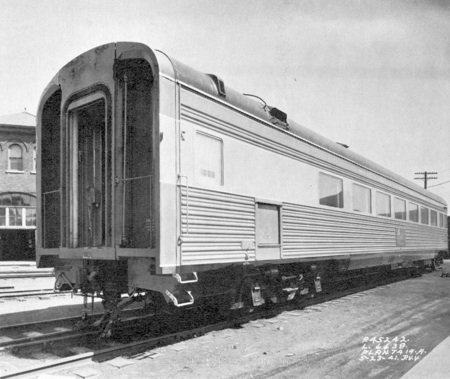
This is the other half of the Articulated-Chair, car number 2447. The photo was taken December 23, 1939. The six sets which made the former six cars into complete units were delivered December 1939 for the Daylight (66-ACM-1). The 14 matching cars were ordered in August 1940 (66-ACM-2). The ACM cars had an empty weight of 99,200 pounds.
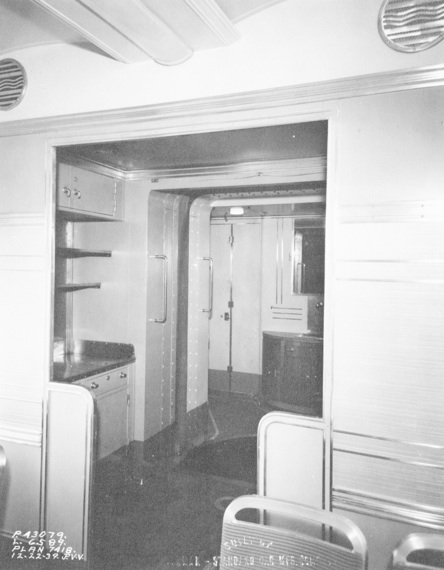
In this view you are looking into the ACM car from the passageway at the articulation. The air-conditioning control locker is located at the forward side of the mens smoking room. Note the numbering device on the end door above the portal window.
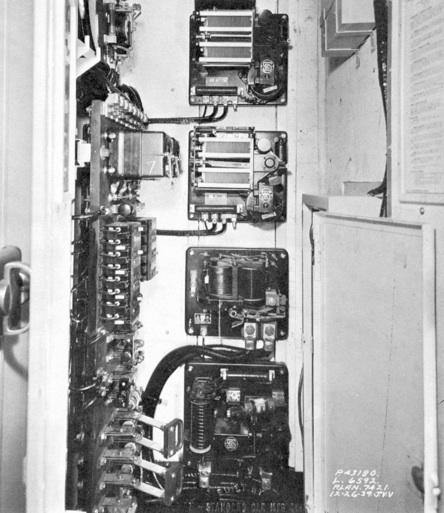
This is the air-conditioning control locker (lower door). You can see the controls for the Waukesha Ice Engine air conditioning system. Above it (upper door) is the public address system amplifier and above that at the top is the motor for the exhaust blower over the toilet room.
If you turn around in the passageway from the air-conditioning locker, you will see the electrical locker. On the 1941 cars everything had become breakers. The voltage regulators are to the left out of sight.
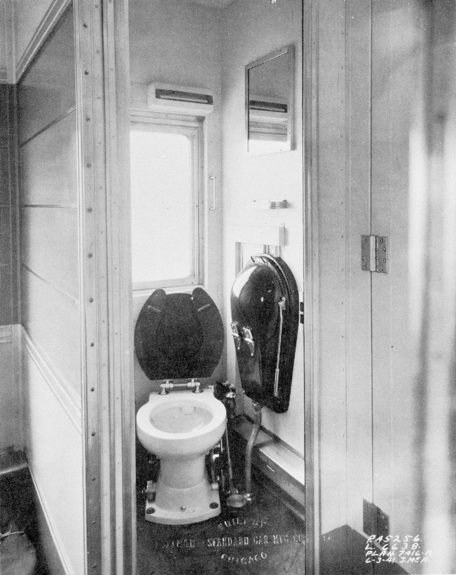
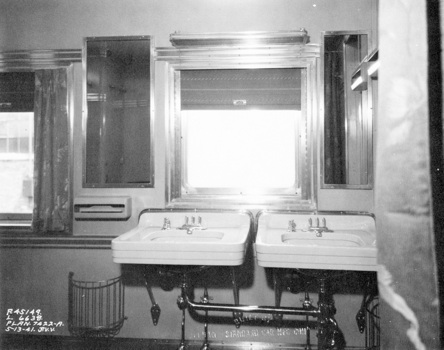
Just a few feet down the passageway is the Mens Smoking Room. This is the toilet room with a hopper and floor pedal flusher. Also shown is one of the two wash basins. The plumbing fixtures were the very best available and all the piping was chrome-plated. Just above the wash basin are 32 VDC and 110 VAC electric razor outlet receptacles.
This is the other side of the Mens Smoking Room. Note the fluorescent lighting on the ceiling. The short window above the sinks was translucent opaque while the one next to the sofa was clear. On the floor under the sinks you can see the stainless steel baseboard heater pipe grille. Just below the mirror are two more razor outlet receptacles. A smoking room would not be complete without an ash tray, also known as Pullman's "Climax" triple-column smoking stand, and it included a cast Southern Pacific "Sunset" medallion plate fastened to the base.
The Mens Smoking Room included a contoured back sofa and chair. Vinyl upholstery was used for all the seats in this room. The water cooler was located in the corner cabinet.
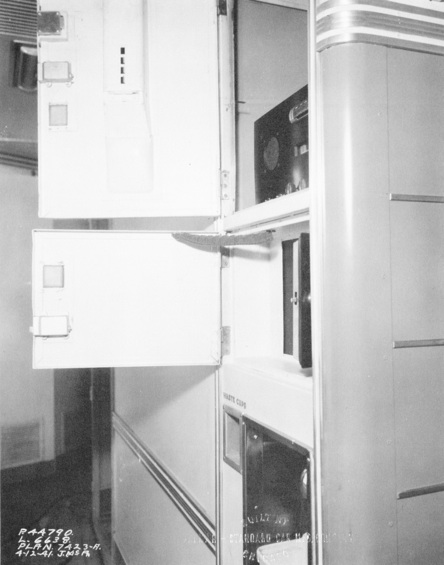
Back outside the restroom a few more feet down the passageway, just before reaching the chair section of the car, was the radio tuner cabinet (upper door) and the microphone cabinet (lower door). The radio tuner was well separated from the public address amplifier. The microphone for the PA system was housed in a small vault-like opening and was used by the train Passenger Agent when he wanted to make an announcement. Below the two doors at the bottom is the dispenser for the water cooler.
This view shows the coach section interior of the 1939 ACM car looking toward the rear or vestibule end of the car. Note that the lights have been turned on.
This is a similar view inside a 1941 ACM car. These cars had an inlaid ball and wing floor pattern and horizontal striped seat fabrics.
Moving to the vestibule end of the 1941 ACM car and looking forward you see the men's restroom and articulated end of the car. Note the round mirror at that end.
Triple Unit Dining Car


The Triple Unit Dining car was made up of three articulated cars. The forward car was the Coffee Shop car, the Kitchen car was in the center, and Dining car was at the rear. SP ordered two sets for the Daylight in March 1939 (delivered in December 1939) and later ordered two more sets in August 1940 (delivered by July 1941). When the 1941 sets were delivered, they were assigned to the Morning Daylight. The 1939 sets were reassigned to the Noon Daylight. The Triple Unit Dining car was unique to the railroad and had never been done before. With 152 seats, the diner could accommodate almost four times as many people as the diner on the original 1937 Daylight. As a unit, the total length was 203 feet 6 inches to the buffers and had an empty weight of 299,800 pounds. The ends of the unit had 4-TC-7 trucks while the inner two articulations had 6-TCA-1 trucks.


A) Hand Brake, B) Electric Locker, C) Folding Washstand, D) Dining Crew Toilet, E) Coffee Tricolator, F) Linen Locker, G) Supply Locker, H) Table, I) Chair


This is the left (south) side view of the 1939 articulated Coffee Shop car, number 10255.
This is the right (north) side view of the 1941 articulated Coffee Shop car, number 10258.
This is the view of the forward end of the articulated Coffee Shop car, also called a dummy end (neither vestibule nor articulated). You can see the inner and outer diaphragms with pantograph gate inside on the right. A hand crank parking brake is inside on the left. These cars had type "H" tight-lock couplers and were 70 feet long over the end sills or 72 feet 2 inches from buffer to the articulation point. These cars weighed 106,000 pounds empty.
This is the forward end of the 1939 Coffee Shop car. Note the porthole door. To the right of the door would be the electric locker and to the left would be the crew's toilet room.
Here is the view of the crew's toilet room with a folding washstand. This was a very tight space, only about 3 feet by 3 feet. Note the small mirror mounted high above the folding washstand.
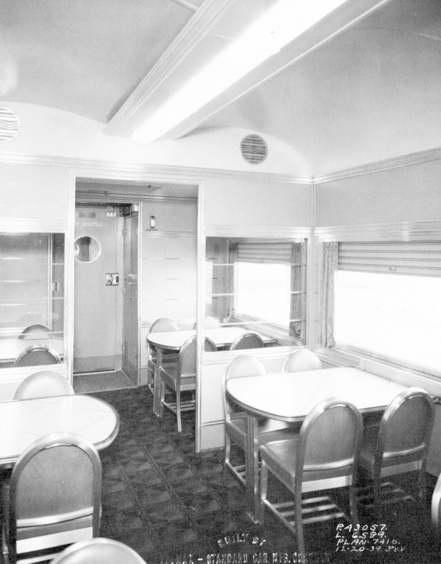
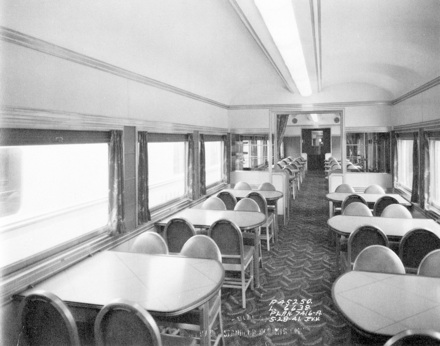
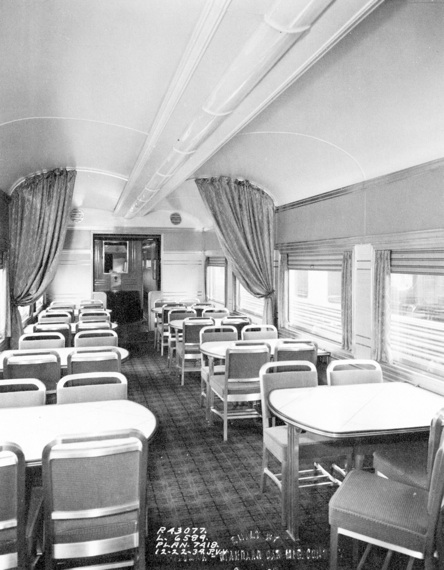
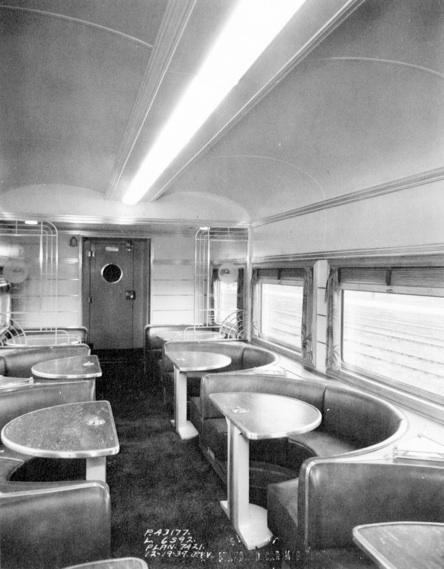
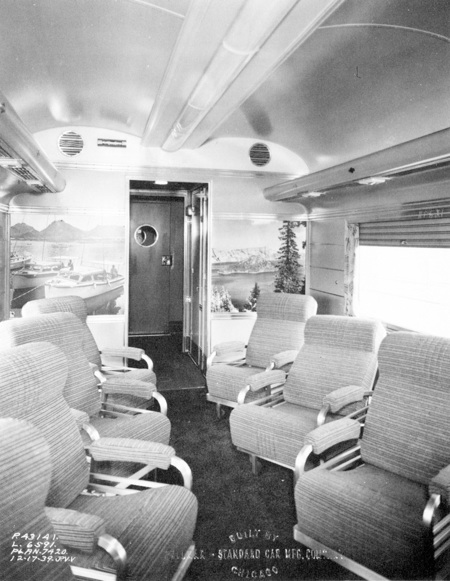
In this view you are at the forward end of the 1941 Coffee Shop car looking back to the articulated end. Note the fern pattern in the carpet compared to the square pattern used in the 1939 cars. The Coffee Shop car had 20 windows and tables each, each table sat four people, thus in all could handle a total of 80 people at one time.
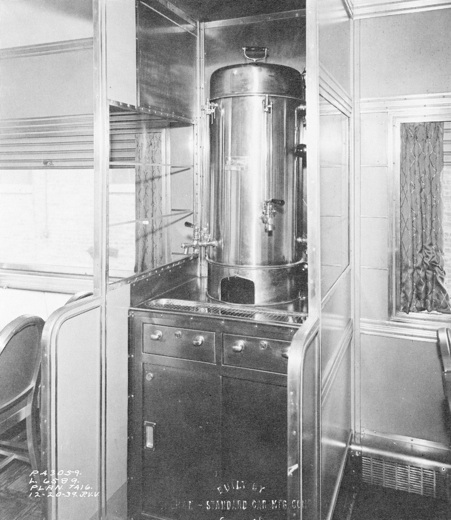
The interior of the Coffee Shop car was nearly identical to the Dining car, with the exception of the divided serving areas located in the center. Here is where the six gallon "Coffee Tricolator" was located, visible to the right of the center aisle. You are looking toward the articulated end of the car.
In this view you see the Coffee Tricolator. Silverware and coffee cups were stored below.
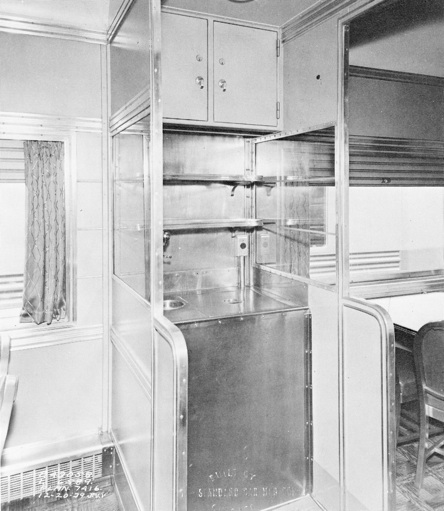
On the other side was the area that housed a water-tap and drinking glasses.
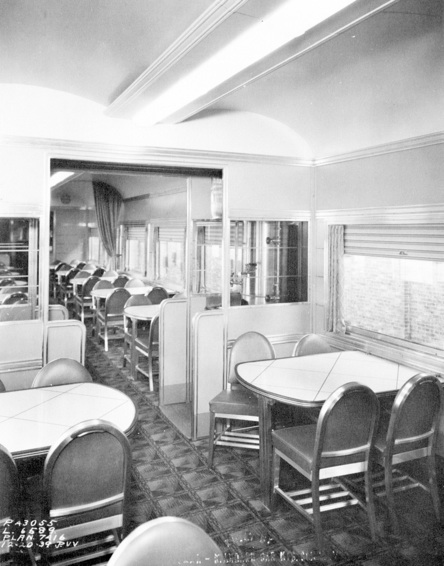
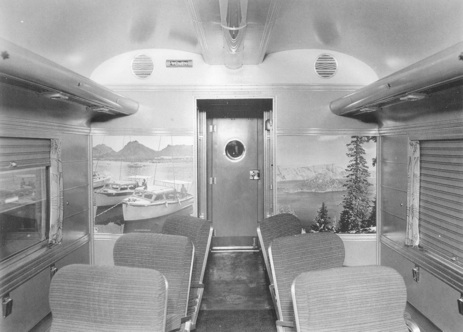
In this view you are at the articulated end of the 1941 Coffee Shop car looking forward to the front end with a porthole door. Note the neon lighting system that ran down the center aisle in the ceiling, which also housed the air conditioning and heating ducts. The portiers (drapes) could be pulled to close off a section if needed.
In this view you see the articulated end of the 1941 Coffee Shop car, the articulation area, and the Kitchen car just beyond. The circular floor section was over the articulated truck, which gave the illusion of moving when the cars were in a curve. Actually it was stationary and the two cars moved. Note the service buffet at the center with mirror above, part of the articulated Kitchen car. The mirror was also a door to access the water cooler behind it. The doorway to the right of the service buffet is the pantry area for the Coffee Shop.
This interior close-up of the articulation shows how well the car builder concealed the fact that two cars were joined at this point. The objective of this design was to allow passengers to pass through the separate cars while creating the atmosphere of one large expanse of unrestricted space. In this view you see the electric locker on the Kitchen car side on the right and the linen locker on the Coffee Shop car side on the left.


A) Electric Locker, B) Service Buffet, C) Linen Locker, D) Refrigerator, E) Dish Bin, F) Ice Cream Well, G) Ice Box, H) Sink, I) Steam Table, J) Range, K) Work Counter, L) Drop Counter,
M) Clothes Locker, N) Milk Well, O) Broiler, P) Ice Box, Q) Hot Table, R) Passing Niche, S) Supply Locker, T) Bread Locker, U) Chipped Ice Tray, V) Bread Locker
This is the left or south side view (kitchen side) of the 1939 articulated Kitchen car, number 10254.
This is the right or north side view (passageway side) of the 1941 articulated Kitchen car, number 10257. Note that kitchen range exhaust was vented by three "weather vaned" smoke jacks along with intake and exhaust vents on the roof. The Kitchen car was 57 feet over end sills or 59 feet 2 inches between the articulation centers and had an empty weight of 87,400 pounds.
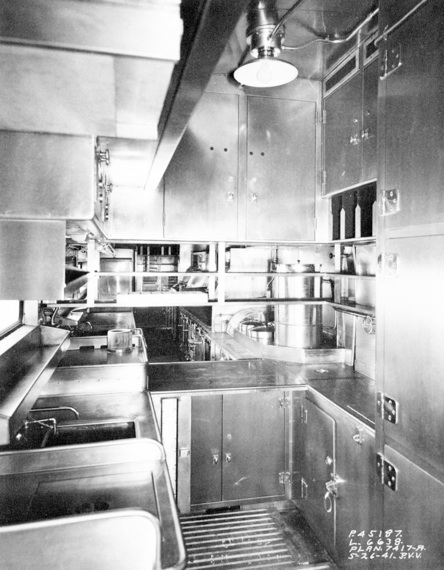
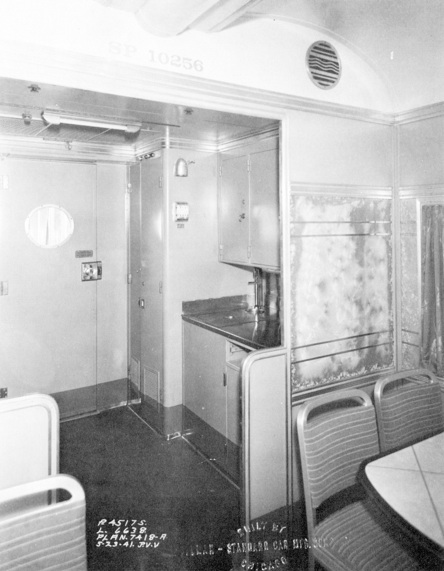
Each Kitchen car was equipped with two pantries; one served the Dining car and the other, the Coffee Shop car. The views shown here were taken at the Coffee Shop end of the Kitchen car. The view on the left is looking out towards the door leading into the articulation area of the Coffee Shop car. Note the two-piece supply loading window. The view on the right is looking into the pantry area from the door. A warming table separates the pantry from the central kitchen.
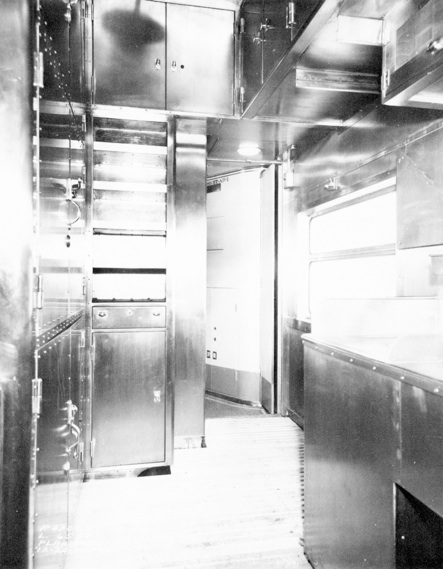
This view is looking down the passageway toward the Dining car. The kitchen is on the other side of the right wall. The access plates in the floor were for inspection and repair of underbody equipment. The passageway had six evenly spaced Spot-ray ceiling lights with air conditioning vents in-between. The floors were rubber tile with inlaid borders indicating the safewalk zone. These cars also had two passing niches along the aisle; one was also an entry door into the kitchen. The door to the kitchen can be seen as the first niche on the right of the isle. Note the inlaid borders on the floor bend in towards the kitchen door.
A loading door on the passageway side was added to the Kitchen car and resembled a baggage loading door. This door was directly opposite of the door to the kitchen across the passageway aisle.
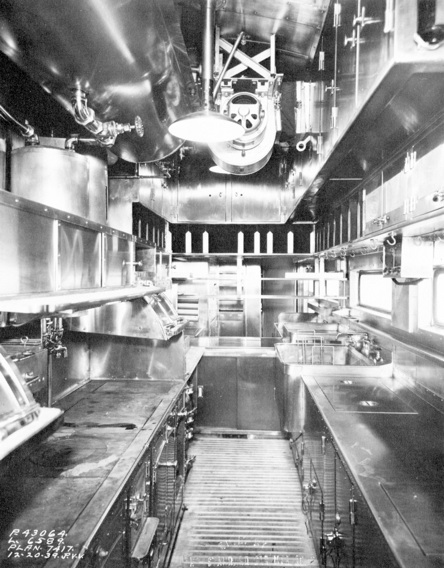

A greater degree of efficiency for meal preparation was available within the central kitchen. Foods which had to be prepared for the Dining car service were available only at specific meal times, while the Coffee Shop served meals throughout the day. To handle the increased demand, the kitchen was equipped with triple oven ranges. Other conveniences included a six gallon "Coffee Tricolator" in each pantry. This view is the kitchen looking toward the Dining Room pantry, the warming table at the end of the kitchen separates the two.
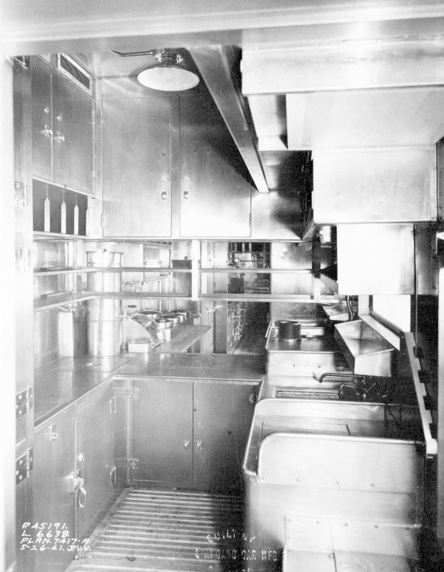
This view is the kitchen looking toward the Coffee Shop pantry, the warming table at the end of the kitchen separates the two. The equipment was stainless steel and removable aluminum floor grates were used for easy cleaning. The kitchen was equipped with steam tables and dishwashers. A new feature in the kitchen was propane operated ranges and reefers, the first on the Southern Pacific system.
This is a close-up view of the Dutch type, two-piece service door to the kitchen area. The door was placed on the kitchen side of the Kitchen car, to the right of the refrigerator. The door was used for kitchen crew entry and supply loading. The grab irons and stirrups were cadmium plated. In the days before mechanical refrigeration, the ice was filled through the hatch located on the roof.
On the same side, two-piece supply loading windows were located at each pantry. The loading windows were later removed and replaced with doors like the one for the kitchen (car 10251 on 1/31/52, 10254 on 11/20/51, 10257 on 8/31/50, and 10260 on 5/26/50).
This is the Dining Room pantry. Although identical to the Coffee Shop pantry, it had to make available the extra amenities needed to serve the more formal Dining car. The view on the left is looking toward the kitchen, separated by a warming table. The view on the right is looking out towards the door leading into the articulation area of the Dining car.


A) Service Buffet, B) Supply Locker, C) Refrigerator, D) Clothes Locker, E) Electric Locker, F) Linen Locker, G) Glass Locker, H) Hand Brake, I) Table, J) Chair
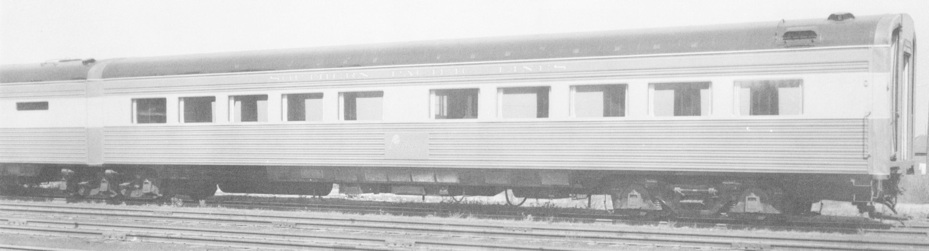
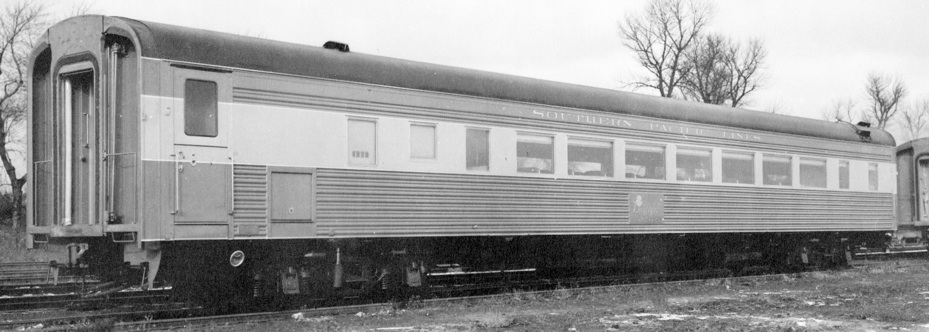
This is the left or south side view of the 1939 articulated Dining car, number 10253. The window pattern on both sides of the car were the same with 9 large picture windows.

This is the right or north side view of the 1941 articulated Dining car, number 10256. The Dining car was positioned at the rear of the Kitchen car for the convenience of Parlor car passengers entering from the rear of the train. The Dining car was 70 feet over the end sills or 72 feet 2 inches from the buffer to the center of articulation and had an empty weight of 106,400 pounds.
The articulated cars allowed wide aisles for passage between the Kitchen car and the Dining car. The semi-circular area allowed the cars to rotate upon the single six wheel truck below. The two circular covers on the floor accessed cables underneath which held the two cars together in the event that the center pin failed. Like the Coffee Shop/Kitchen car articulation area, the Kitchen/Dining car articulation area had a similar service buffet, mirror, and water cooler. To the right of the buffet is the passageway leading to the Coffee Shop car and to the left is the door leading to the Dining pantry.
Like all cars that had articulations, the Kitchen/Dining car articulation had three-piece full width diaphragms (one on each side and one on the roof). These diaphragms had the color pigments molded in them and were not painted.
At the articulation end of the Dining car was a service buffet located on each side of the aisle. The silverware was kept in the drawers below the counter top. Note the round radio speakers near the ceiling of the Dining car.
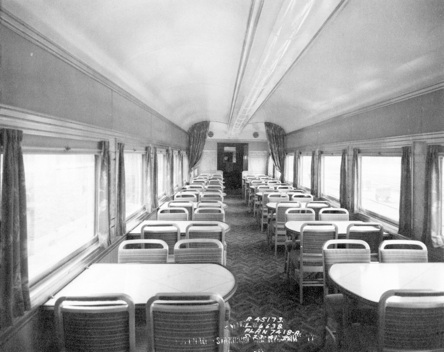
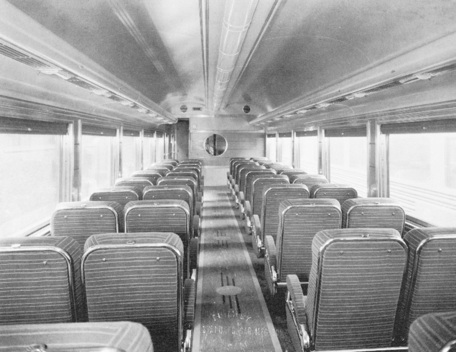
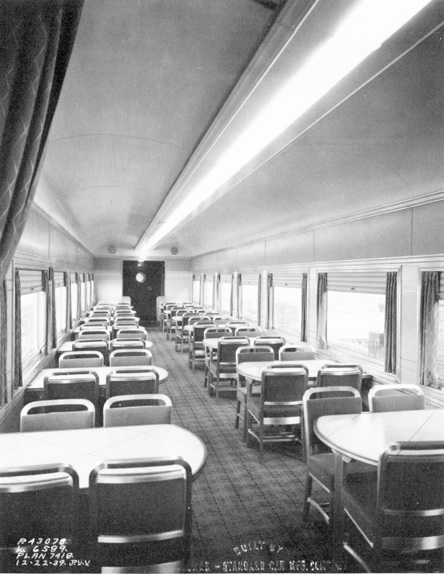
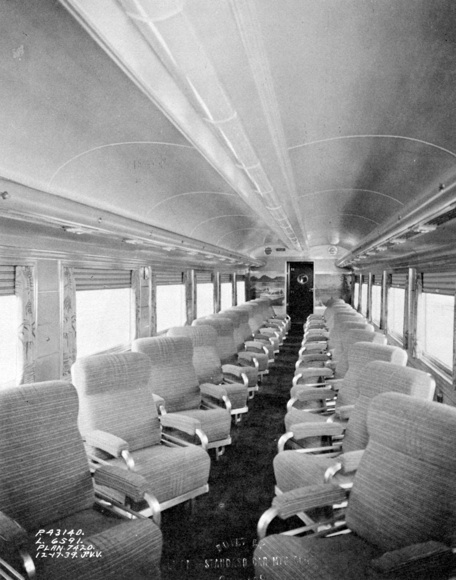
In the left photo is the 1939 Dining car and in the right photo is the 1941 Dining car. Note the carpet and drape pattern differences as well as the upholstery used on the chairs. You are looking towards the articulated end of the diner. These cars were the most luxuriously appointed diners with carpets, curtains, window shades, and drapes. There were 9 tables on each side, each positioned on the centerline of the large picture windows. The Dining car could accommodate 72 passengers at one time. Note the full length neon ceiling light which provided the proper lighting for dining.
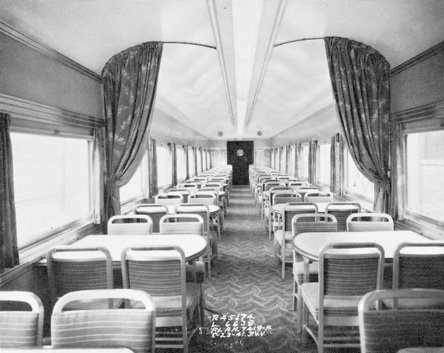
In the left photo is the 1939 Dining car and in the right photo is the 1941 Dining car. You are looking towards the back or dummy end of the Dining car. The table and chair frames were satin-finished aluminum. Carpets, curtains, drapes, padded chairs, and window shades all harmonized with interior color schemes.

In the left photo is the 1939 Dining car and in the right photo is the 1941 Dining car. The photos show the rear end of the Dining car. The rear door was equipped with a porthole window and lead to the connected Articulated Chair car. The lockers to the right housed the air conditioning, electric, and heating controls as well as drinking glasses and supplies. Water service was also on the right. On the left was the clothes locker, refrigerator, and ice reefer. The grated vent in the ceiling is the air conditioning inlet. Although these cars had radio speakers, they were not used during mealtime. Note in the left photo that the photographer left his extension cord on the floor.


A) Vestibule, B) Dutch Door, C) Hand Brake, D) Luggage Compartment, E) Supply Locker, F) Hopper, G) Womens Restroom, H) Water Cooler, I) Low Bulkhead, J) Mens Restroom,
K) Control Locker, L) Electric Locker, M) Reclining Chairs
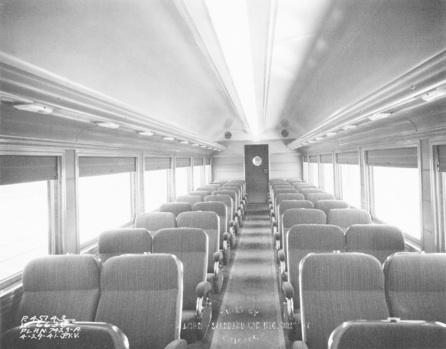
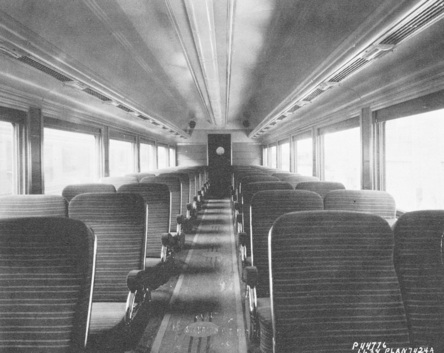
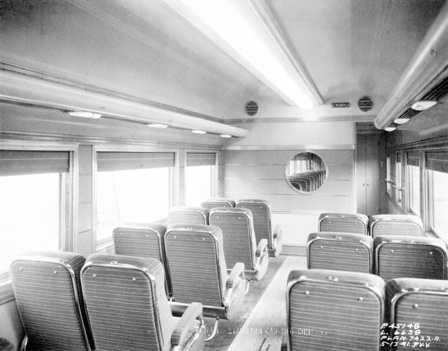
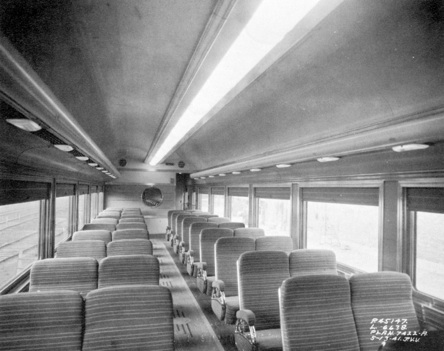
Two 44 seat Chair cars were included with the group of cars ordered to replace the former Daylight in 1939. Nine additional 44 seat Chair cars were ordered in August 1940, four of these were assigned to general Daylight service. The cars for the Daylight had luggage elevators at the front end. The cars were 79 feet over the end sills or 81 feet 2 inches over the buffers and had an empty weight of 122,000 pounds. They were also equipped with 4-TC-7 trucks, type "H" tightlock couplers, cadmium plated grabirons and stirrups, Waukesha air conditioning, and engine driven generators. The Chair cars were added to the train when extra seating was needed on the Daylight.
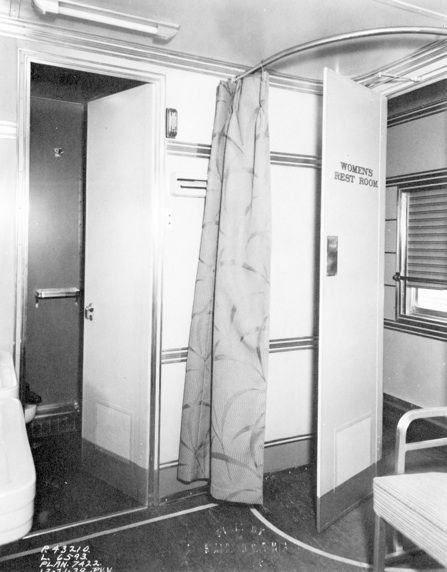
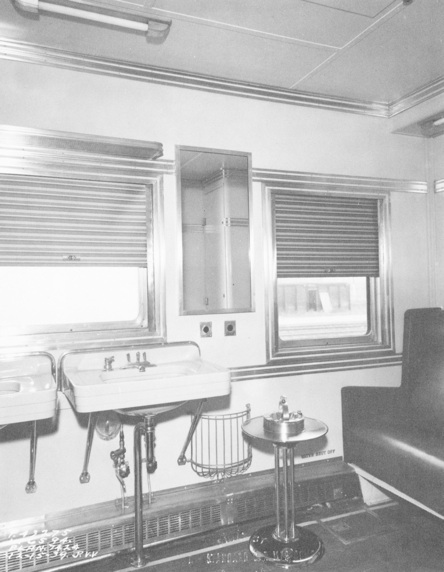
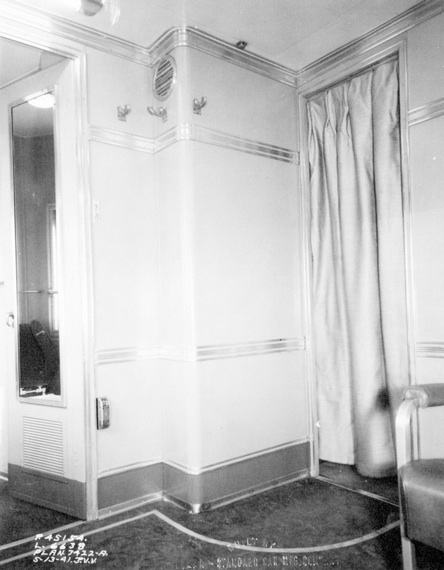
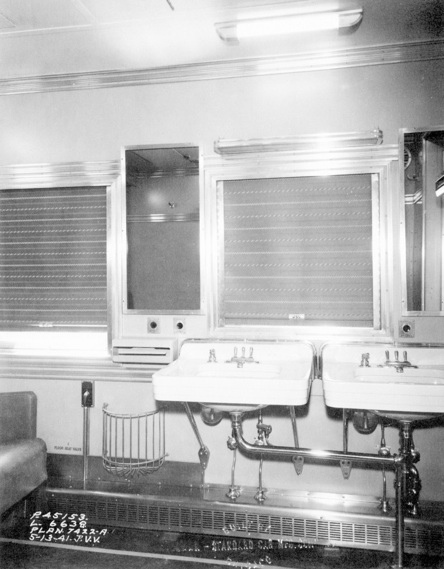
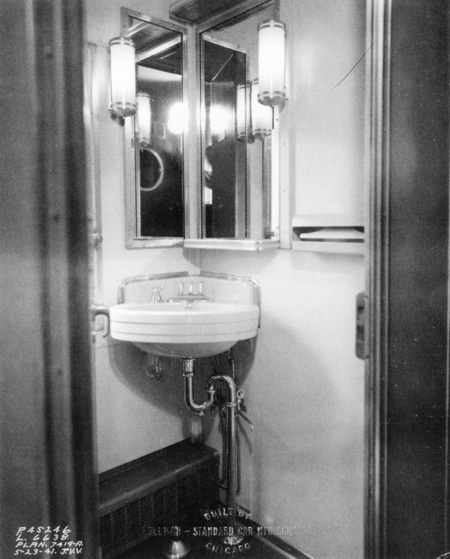
Entry to the car from the outside was at the front end only. After passing the luggage compartment you would walk down a small passageway next to the women's restroom. This view shows the door to the women's restroom looking out to the passageway. The other door to the left was for the toilet room. The women's restroom also served as a dressing compartment for the coach passengers. For this reason, the curtain around the door at the entrance provided an extra measure of privacy.
This view shows the triple chair dressing mirror and table and two seats to the left. If you look closely in the mirror, you will see that the curtain has been closed. The photographer setup his camera in the toilet room to make this shot. The locker to the left of the mirror housed the water cooler. Access to the water from the cooler was in the passageway outside the restroom.
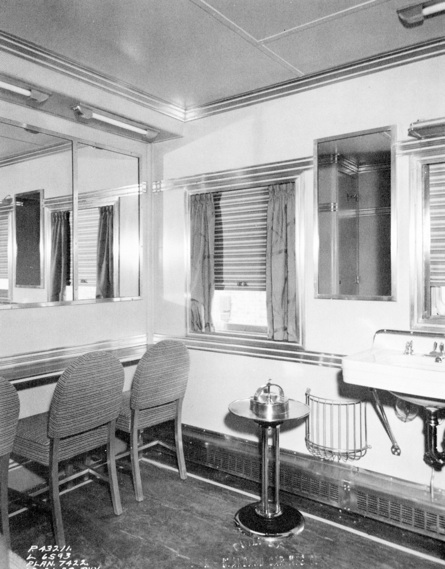
These two views of the women's restroom are looking toward the two windows. Note the smaller raised window above the wash basins. The women's restroom included fabric covered chairs, curtains on the windows, and a vanity table. A standing ash tray was included in case you needed a smoke.
The bulkhead at the front of the Chair car had a circular mirror and aluminum trim as part of the decor. On the other side of the mirror is the women's restroom. The passageway is to the right of the mirror. If you look carefully, you can see the supply locker at the end of the passageway.
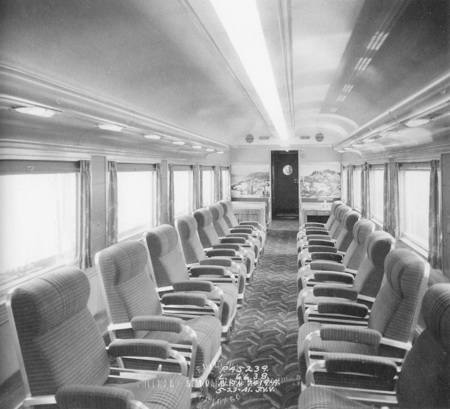
Turning around and looking towards the rear you see the bulkhead, mirror, and passageway to the men's restroom, and ultimately to the rear door of the Chair car. The floor was two tone rubber tile with a ball and wings design. Note that all lighting systems are on, making the car bright and cheerful.
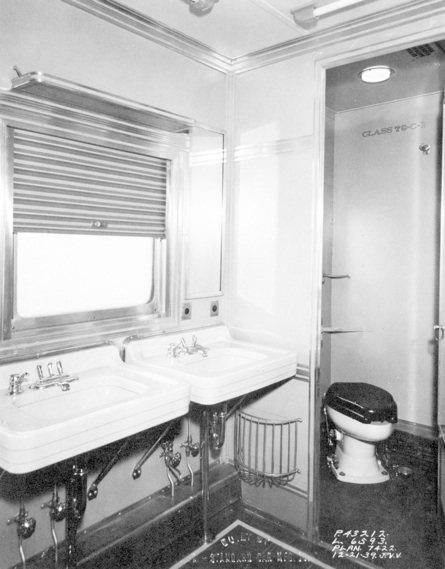
The men's restroom was located at the rear of the Chair car with access from the passageway there. Note a curtain offered the only covering to the doorway. Decorative chrome strips were used extensively throughout the restrooms and coach compartments. There is a radio speaker recessed in the wall near the ceiling. The open door with the mirror on the left is the door to the toilet room.
The men's room had a vinyl covered sofa and chair and a standing ash tray (not shown) for smoking. The restroom floors were linoleum. Note the window shades are pulled down. The two round electrical outlets below the mirrors provided 32 volts DC, while the other produced 110 volts AC. It was amazing that rail travel was so well accepted in those days that manufacturers sold 32 volt electric shavers for the frequent rail travelers.


A) Clothes Locker, B) Service Buffet, C) Counter, D) Refrigerator, E) Supply Locker, F) Sliding Door, G) Folding Seat, H) Loading Door, I) Supply Locker, J) Coffee Urn, K) Lounge Table,
L) Electric Locker, M) Hand Brake
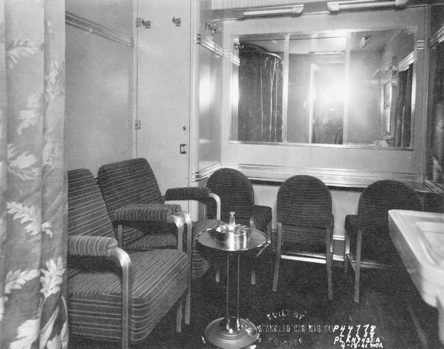
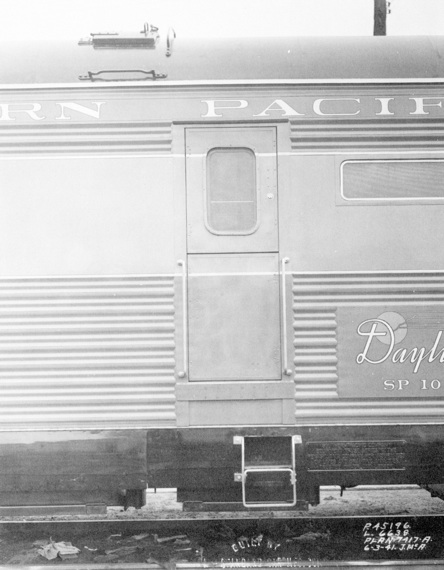
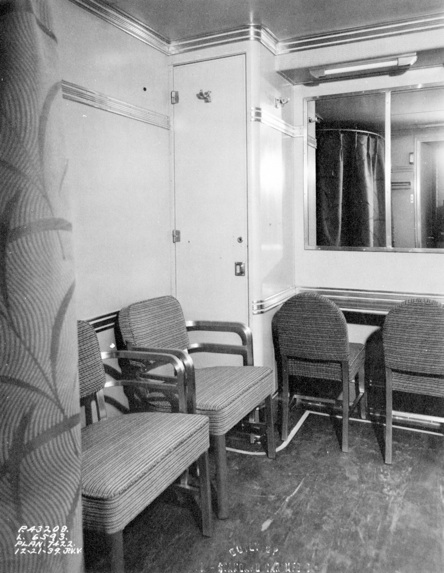
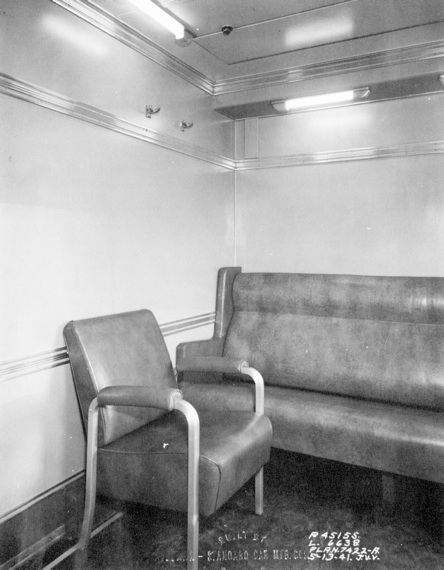
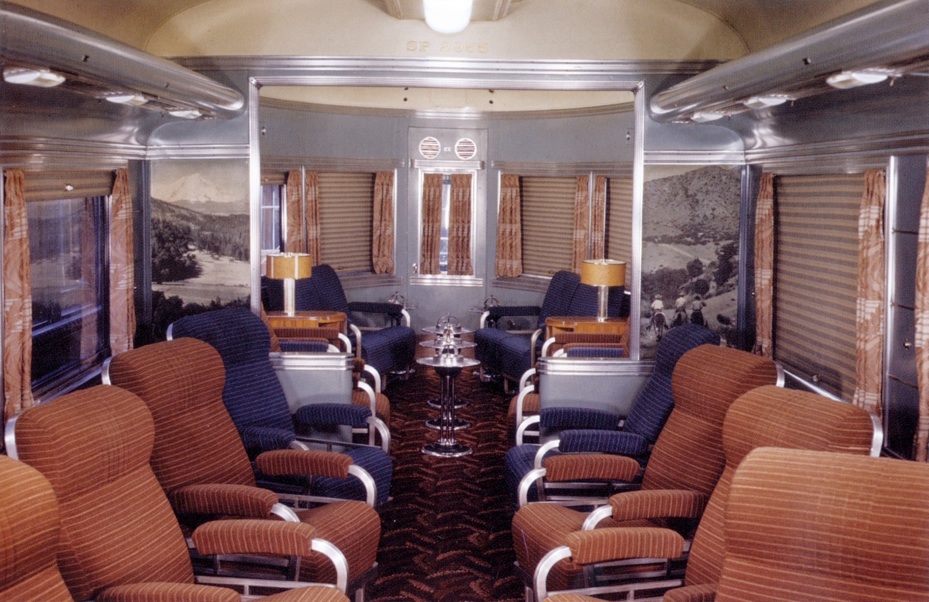
Two Tavern lounge cars were ordered in March 1939 to replace the 1937 Daylight cars. The new Tavern cars were delivered in December 1939. The Tavern cars had radio receivers installed on them, as noted by the radio antenna and posts on the roof. These cars were 79 feet long over end sills or 81 feet 2 inches over buffers and had an empty weight of 123,100 pounds. Southern Pacific considered the Tavern cars the main "money makers". Here passengers could relax and have a much needed drink ... or two or three! The Tavern cars remained on the Coast Daylight until the 1960s when they were finally replaced with the famous Dome Lounge cars.
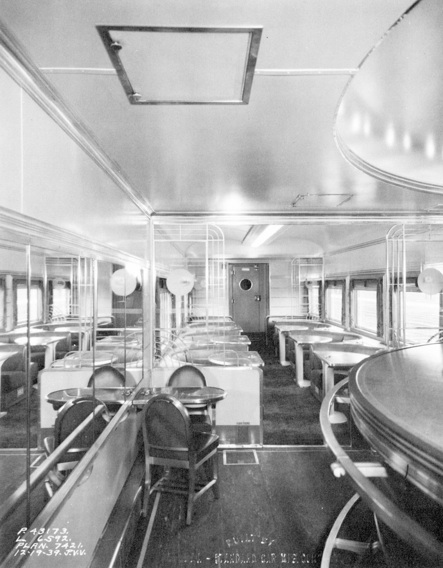
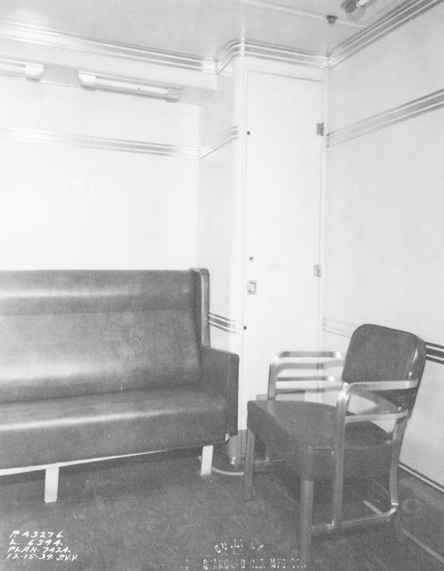
The 1939 Tavern cars were for the most part identical to the 1938 cars. This is the front end of the Tavern car showing the aluminum and etched glass partitions. The last two seating areas next to the partitions are the card table sections. Just beyond that on the other side of the walls was the service area that had a clothes locker, service buffet, counter, refrigerator, ice reefer, and supply locker.
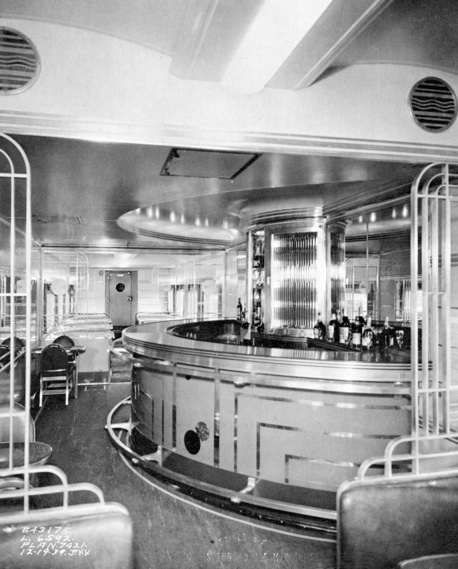
The circular bar not only made a dramatic visual impression, but it also provided adequate space to incorporate the two small tables without hindering the traffic flow of the aisles. These Tavern cars sat 26 people in each lounge section plus 2 people at each of the two small tables, a total of 56 people plus an extra 10 could stand at the bar.
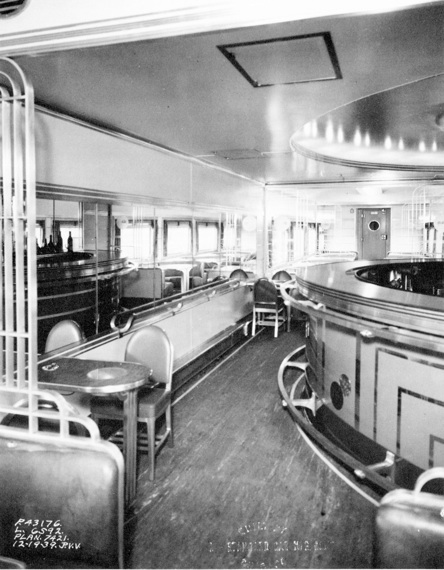
The Tavern car was divided into three sections, a forward and aft lounge or cocktail section and center bar section. Linoleum floors were utilized in the area of the bar. However, traditional carpeting was used throughout the lounge areas. Note the small tables in the bar area had a round inlaid light. Also note the hand rail backed with mirrors.
This view of the bar shows hand and foot rails plus decorative aluminum strips in a right angle pattern. This section was backed by mirrors, with a center glass and liquor cabinet. The whole arrangement gave the illusion of being a complete 360 degree circle. The bar section had a low ceiling except above the bar. The floor was blue rubber tile with cream inlaid borders. Note the bottle arrangement at the bar which was that way when in service.


Among the distinctive features of the decor within the Tavern car were the etched glass and aluminum partitions, the uniquely designed table pedestals, and the triangular lights and defusers located between the booths. Note that every table in the Tavern had an ash tray. The cars were also equipped with "spectrum lighting" in the cocktail sections.
This view was taken facing toward the rear of the Tavern car. Each lounge section had four windows on each side with curtains and Venetian blinds. Note the conductor's valve located to the right of the opening at the end. Just beyond the walls was an area that housed the electric lockers.
The Tavern car had a mid-car low loading door that looked like one of the baggage elevator doors. The loading door was located on the bar side of the car for easy restocking of the bar supplies. When the Tavern cars were added to the Coast Daylight, they operated with the bar (and exterior loading door) on the engineer's side (right side) of the train. Effective with realignment of equipment into the newly established 1941 Daylight consists, the Tavern cars were turned to operate thereafter with bar and loading door on the fireman's side (left side) of the train.
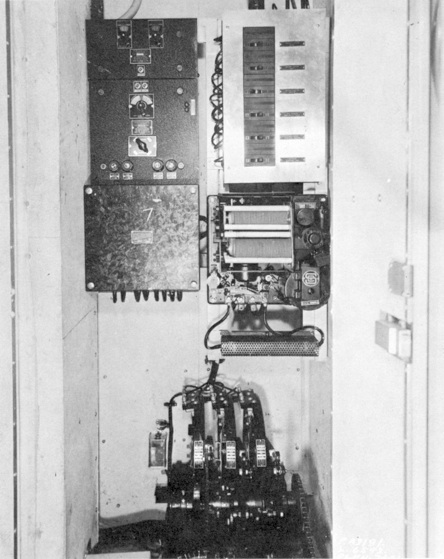
This electric locker at the rear of the Tavern car housed the controls for the air conditioning, electrical, and heating systems. It also housed a motor driven cam assembly for synchronizing the "spectrum lighting" color change, located at the bottom of the locker. The Tavern car had a unique lighting system that slowly cycled through the colors of the rainbow. Each cam actuated an on-and-off microswitch for color balance going through the spectrum. Three basic colors were used: red, yellow, and blue. The starting color was red, then yellow was added producing orange, then yellow appeared when red ended its cycle. Blue was then added producing green, next was blue when yellow ended, then red was slowly added to produce purple. Finally, as blue ended red appeared, and thus the color cycle sequence started again. The speed of the color change could be varied by a rheostat.
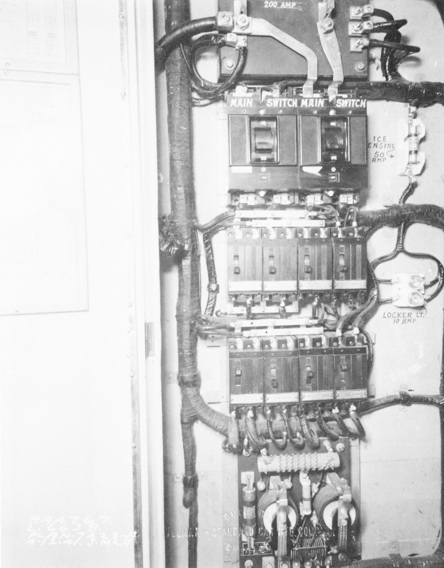
The regulator locker housed voltage regulators, circuit breakers, resistors, and coils for maintaining each system.


A) Hand Brake, B) Equipment Locker, C) Mens Restroom, D) Hopper, E) Storage Locker, F) Electric Locker, G) State Room, H) Table, I) Womens Restroom, J) Control Locker,
K) Baggage Racks, L) Vestibule, M) Dutch Door, N) Reclining Chair
Two mid-train Parlor cars were included among the 28 car order which was placed in March, 1939 to replace the 1937 Daylight. The two Parlor cars were needed to supplement the first class section on the Daylight trains. The cars were delivered in December 1939. The Parlor cars were positioned directly behind the Tavern car, with the Parlor-Observation car following. At mealtimes, it was necessary for the Parlor car passengers to pass through the Tavern car and several coaches before reaching the Dining car. The Parlor cars had baggage elevators at the vestibule end at the rear. The cars were also equipped with body hung generators and 4-TC-6 trucks. These cars were 79 feet over end sills or 81 feet 2 inches over buffers and had an empty weight of 123,000 pounds.
Exiting the Tavern car from the rear would take you into the Parlor car. At the front you would traverse through a passage way which would take you around the men's restroom and the State Room or also called the Drawing Room, which was available for private parties to reserve at an extra cost. In this view looking at the forward end of the Parlor car, the State Room aisle window is on the right and windows facing outside are on the left. In font of you is a three compartment equipment locker which housed the water cooler (doors are open in the right photo). On the other side of the locker would be the men's restroom. The porter's display panel above with ten lights was actuated by a push button located on each pier panel between the windows in the main compartment and one in the State Room when passengers required service.
The State Room or Drawing Room could accommodate five people, with three seating spaces on the sofa and two additional side chairs. Note the sofa had two arm rests that could fold out for use. The State Room also included a writing-card table (not shown but would be between the two windows in the left photo) and a coffee table (shown in the right photo). Light fixtures were on the ceiling and the decorative metal strips balanced the color change on the walls. The windows on the left faced the outside while the one on the right faced the passageway. Hollywood celebrities and other well know people at the time, desiring to avoid the crowds, reportedly enjoyed the privacy of the State Room on the Daylight.
You may be thinking why two names for this room, State Room or Drawing Room? Pullman-Standard, the builder for these cars, had floor plans that all referred to the private room as a "State Room". Most early Southern Pacific literature, including public timetables, never listed or advertised the State Room in the Parlor cars. It was not until the September 1952 issue of the SP public timetable that a "Parlor Car with one Drawing Room" was first listed. These cars continued to be listed as drawing room parlor cars until they were withdrawn from service. One possibility that SP did not advertise the existence of the "Drawing Room" may be that SP believed they should be held for special passengers and not advertised to the general public. The drawing rooms in the Parlor car was the only daytime first class private rooms available between San Francisco and Los Angeles on the Daylight.
The Drawing Room also included a private enclosed toilet annex which was equipped with a double-pan, extended bowl hopper and wash basin with soap dispenser. The car numbering device was also located here, in the window. Note in the lower right of the photo is the writing-card table.
In this view you are looking towards the forward end of the Parlor car in the main cabin. Note the circular mirror and the passageway on the left. Just on the other side of the bulkhead is the Drawing Room. The air conditioning and heating vents were located above each window.
In this view you are looking towards the rear end of the Parlor car. The main cabin seated 27 passengers and included rotating-reclining contoured stuffed chairs with padded arm rests, window shades, full length neon lighting system over the aisles, porter call-buttons and photo murals plus improved fabrics, carpets, and colors. The main cabin was finished like a luxury hotel lobby with harmonizing colors and fabrics.
At the rear of the car was a passageway where the women's restroom was on the left and the electric locker and control locker was on the right. Just beyond that was the baggage racks on both sides, then the porthole window door to the vestibule and connecting Parlor-Observation car.
The photo murals depicting western scenes adorned the bulkhead at the rear of the Parlor car. On the left is the Hotel Playa de Cortes, Guaymas, Sonora, Mexico and on the right is Crater Lake, Oregon. The 1939 Parlor cars along with the Parlor-Observation cars were the first SP cars to have photo murals.
This view shows the vestibule (rear) end of the Parlor car coupled to the forward end of the Parlor-Observation car. The 1939 Parlor cars had a drip molding strip over the vestibule door as well as above the car windows. The trucks are equipped with derailment safety guides that are part of the truck frame journal box pedestal tie bar and are located directly below the journal boxes. The side portions of the full-width diaphragms were made from sheet rubber impregnated with the respective Daylight colors.


A) Hand Brake, B) Hopper, C) Mens Restroom, D) Womens Restroom, E) Luggage Compartment, F) Electric Locker, G) Equipment Locker, H) Water Cooler, I) Table, J) Writing Desk, K) Reclining Chair
Two Parlor-Observation cars were ordered in August 1940 and were delivered in July 1941. The 1941 Parlor-Observation cars were identical to the 1939 Parlor-Observation cars ordered in March 1939 and delivered in December 1939. Upon arrival of the newer cars, the 1939 cars were assigned to the Noon Daylight and the newer cars to the Morning Daylight. These cars had a radio and public address system with a radio antenna on the roof. The main cabin windows were 5 feet 3 inches wide, the rear observation section's 3 feet 6 inches, the end door's 1 foot 6 inches, and the restroom's 2 feet 3 inches. They were also equipped with side markers and a backup light. The 1941 cars were the last corrugated side cars built for the Daylight. The Parlor-Observation cars were 79 feet long over end sills or 81 feet 2 inches over buffers (pulling faces of the couplers) and had an empty weight of 115,400 pounds.
Although the Parlor-Observation car did not have vestibule doors, they were equipped with the baggage elevator system. Entry from the outside into the Parlor-Observation car was through the connected Parlor car. These cars had Waukesha ice and generator engines fueled by propane, radio and public address system, radio telephone capabilities (although they were never installed), improved interiors, and 4-TC-7 trucks.
Entering the Parlor-Observation car from the rear end of the Parlor car, you would walk through a porthole door into a passageway which had access to the men's and women's restrooms, the luggage compartment, electric locker, equipment locker, and water cooler. In this view you are in the main cabin looking towards the front of the car through the passage way. To the left of the porthole door is the women's restroom. Across from that (not visible) is the men's restroom. Next to the women's restroom are the pantograph gates enclosing the luggage compartment and elevator. The air-conditioning blower and condenser access hatch and recirculating air grille are visible in the ceiling.
In this view you see the lower door open to the equipment locker and next to that is the water cooler. Above is the radio console which furnished entertainment for the first class passengers in the Parlor car and Parlor-Observation car. There was also a public address system for making train announcements throughout the cars.
The individual men's and women's restrooms were smaller than the smoking and lounging facilities contained in the chair cars, but had an added stylish touch with Art Deco lights beside the mirrors.

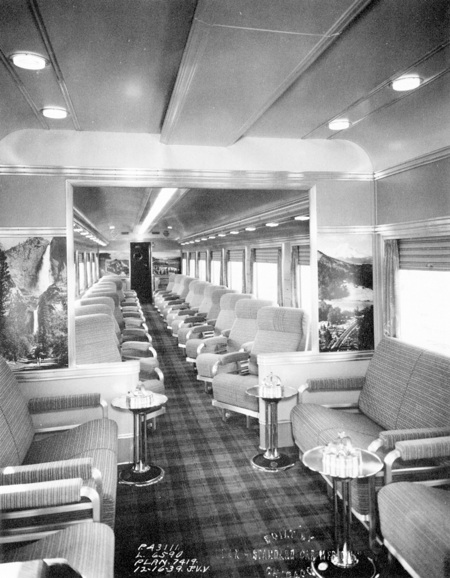
The main compartment was divided into three sections, a card section, a parlor section, and the observation section. In this view you are looking at the card section at the front of the car. Two booths with tables were located at the forward end which provided for card games and other activities for 8 people. A writing desk, supplied with the appropriate Daylight stationery for those sending letters or postcards, was also furnished (small chair and table on the right). The magazine table is on the left. It is unknown why the walls of California's Daylight were flanked with photo murals of the Columbia River gorge of Oregon or of the Superstition Mountains of Arizona. Note down the center passageway is the women's restroom on the left and men's restroom on the right.
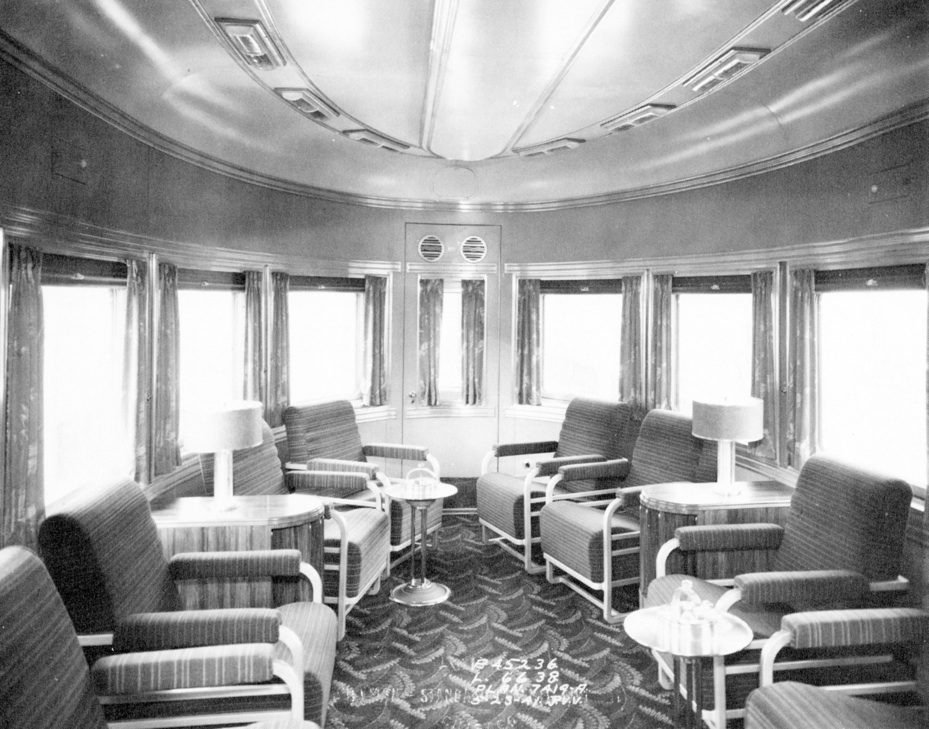
This view is from the front looking toward the rear of the car. The seating capacity in the parlor section was 22. The chairs revolved and reclined and had padded arm rests.
This view is from the rear of the parlor section looking toward the front of the car. Note all the lighting systems are on.
At the end of the parlor section on the other side of the divider wall you see the observation section. Lounge seats occupied the observation section that could seat 10 people. Although the Parlor-Observation car had only 22 revenue seats, the other seats in the observation section and card section were for general use by all parlor passengers. Note the two murals on the divider in the parlor section.
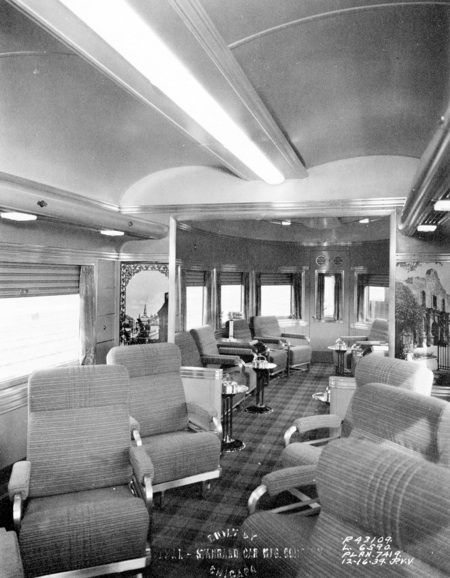
This is another view of the back portion of the parlor section, but in the 1939 Parlor-Observation car. Though the layout in the 1939 and 1941 cars were similar, note the differences in carpet, drapes, and fabrics on the seats. Also note the murals were different too. It seems unusual that the Daylight in California should include murals depicting scenes of the New Orleans French Quarter or of the Alamo in San Antonio.
This view of the 1939 Parlor-Observation car is from the back of the observation section looking toward the front.
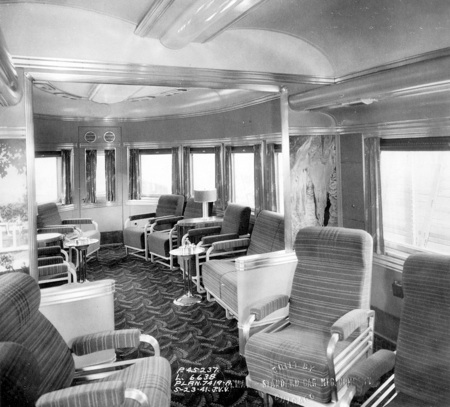
This view is of the observation section of the 1941 Parlor-Observation car. The observation section was a popular place, just like the Tavern cars. The observation section had two double and six single seat sofas for the enjoyment of the parlor passengers. These cars were also equipped with porter call-buttons, Spot-ray and neon lights, and the much needed ash trays, also known as Pullman's "Climax" triple-column smoking stands. SP touted the new ceiling lights as "giving the nearest thing to daylight yet discovered". Note the two speakers on the rear emergency door with a volume control knob between them. Also note just above the rear door is a round access hatch for maintenance of the rear back-up light. There were also rectangular access hatches on both sides for maintenance of the side marker lights.
This is one of SP's promotional photos of the observation section in the 1939 Parlor-Observation car number 2952 or 2953. This really helps you visualize the colors! The interior of the car is in the tan scheme with brown plaid carpet, while the revolving parlor chairs are in a Pebble Tweed Strié pattern fabric in either green or rust color. The 1941 Parlor-Observation cars would be exactly the same except a fern pattern was used in the carpet, patterns in the drapes were different, fabrics for the seats differed, and the table lamps differed. Compare this photo to the one below.
This color photo is of the observation section in the 1941 Parlor-Observation car number 2955. The car was repainted and upgraded in 1949 for service in the new Shasta Daylight.

These cars had sleek lines with all the compound curves blending. A rear emergency escape door was added to the 1939 and 1941 cars to comply with a new rule of two escape exits for each passenger car. A safety bar and a handle were placed across the rear door window. Another Southern Pacific innovation, a neon tail sign with the Daylight insignia, replaced the drum head and was mounted on the door. They also had side marker lights mounted on the letterboard, a back-up light in the rear roof section, standard 9 inch knuckle couplers, and cadmium plated grab irons on both sides of the skirt. The back-up light was a locomotive headlight which was used for back-up movements into yards after dark. In later years this was replaced by a red Mars light which would turn on when the train slowed down and stopped at stations. This is Parlor-Observation car number 2955, photo taken on May 23, 1941 at the builders yard and the car used in this 1941 consist.
The rage of the age when introduced to mass production in 1937, neon tubing was many times brighter than anything yet seen for commercial signing. SP was quick to apply the new technology for identifying tail signs on their updated Daylights. The 1939 and 1941 Parlor-Observation cars were equipped with a neon tail sign with the Daylight herald. As much for safety as cosmetic appeal, the all red herald and neon frame (on black background) provided a candle-power illumination equivalent to the side marker lights.
By the late 1950s SP decided to cut costs on many of their trains, which included gradually removing the neon tail signs on all Daylight equipment. As the story goes a woman named Tummy Deaver was a car clerk at Mission Road Coach Yard in 1960 when the neon tail signs were removed from the Daylight Parlor-Observation cars. An active topic within the womens' locker room was Tummy's romantic aspiration for Fred Hill, then a college student and part time SP Passenger Consist Analyst who would later acquire the Original Whistle Stop train store in Pasadena, California. While the ensuing details were forever secreted to that ladies locker room of many years ago, it has been told that credit goes to Tummy Deaver for saving a Daylight tail sign which is today proudly displayed at the Original Whistle Stop. Do you see it?
Photos From The David Randall Collection